1. About ToF AR
ToF AR, Time of Flight Augmented Reality, is a toolkit library intended to aid in Unity application development. It consists of a group of functionalities with the ToF camera at its core.
1.1. System requirements for ToF AR
1.1.1. Supported devices for applications developed with ToF AR
Please refer to the section list of SDK compatible devices for a list of Sony, Samsung, Huawei, Honor and Apple devices supported by the ToF AR SDK. This list also includes the camera IDs and default settings for supported devices.
1.1.2. Recommended software versions for ToF AR application development
-
Unity 2021.3.31f1, Unity 2022.3.11f1 (Unity 2020 or later is required)
with Android and iOS builds set up.For Android setup, please see Android environment setup in the Unity manual. -
AR Foundation 4.2.8
-
ARCore Extensions for AR Foundation 1.40.0
1.2. 3D coordinate system of ToF AR
The 3D coordinate system of ToF AR is called the camera coordinate system. The camera coordinate system is a left-handed coordinate system with the ToF camera as the origin. The unit of measurement is meters.
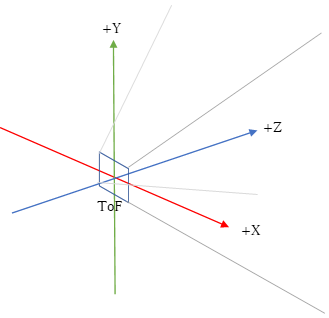
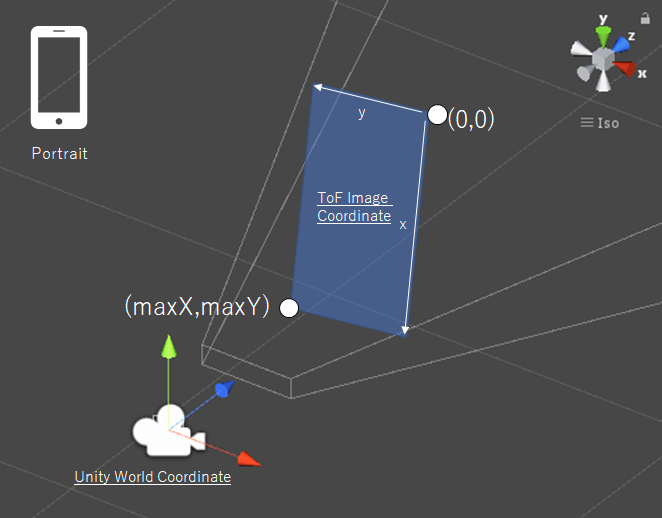
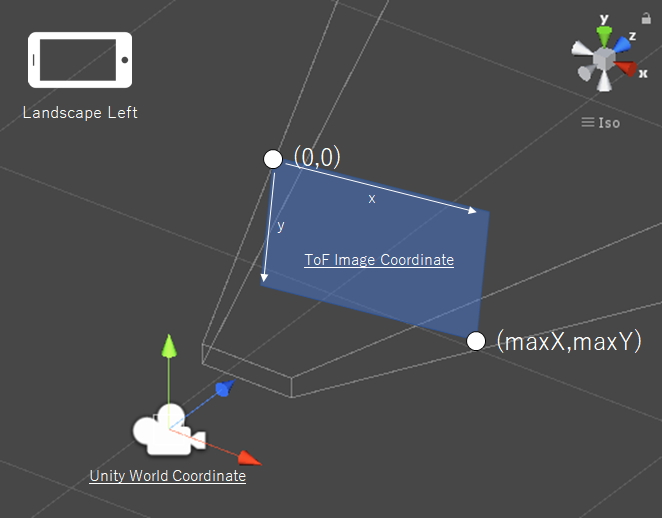
1.3. Unity world coordinate system and ToF camera image coordinate system
The Unity world coordinate system is a left-handed coordinate system.
The ToF camera image coordinate system is a two-dimensional coordinate system that depends on the orientation of the device.
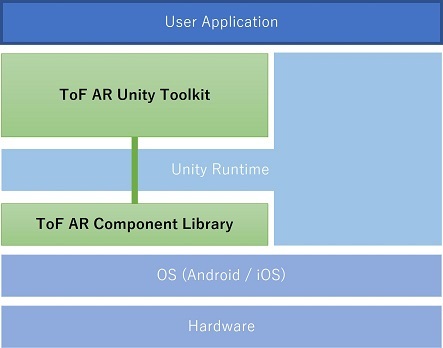
2. ToF AR Overview
2.1. System diagram
ToF AR consists of two parts:
-
ToF AR Component Library accesses the hardware, such as the RGB camera and the ToF camera, and implements algorithms, and so on.
-
ToF AR Unity Toolkit is a Unity wrapper for the various functions in the ToF AR Component Library.
The ToF AR Unity Toolkit is the part that application developers use directly.
2.2. Components and Toolkit
ToF AR provides a Manager Prefab and a Visualization Prefab as a Toolkit for each Component that carries out a subfunction. A Manager Prefab manages Components. A Visualization Prefab displays the processing results of Components. The results are transferred from the Manager Prefab to the Visualization Prefab and User Applications via Stream. The figure below shows these relationships.
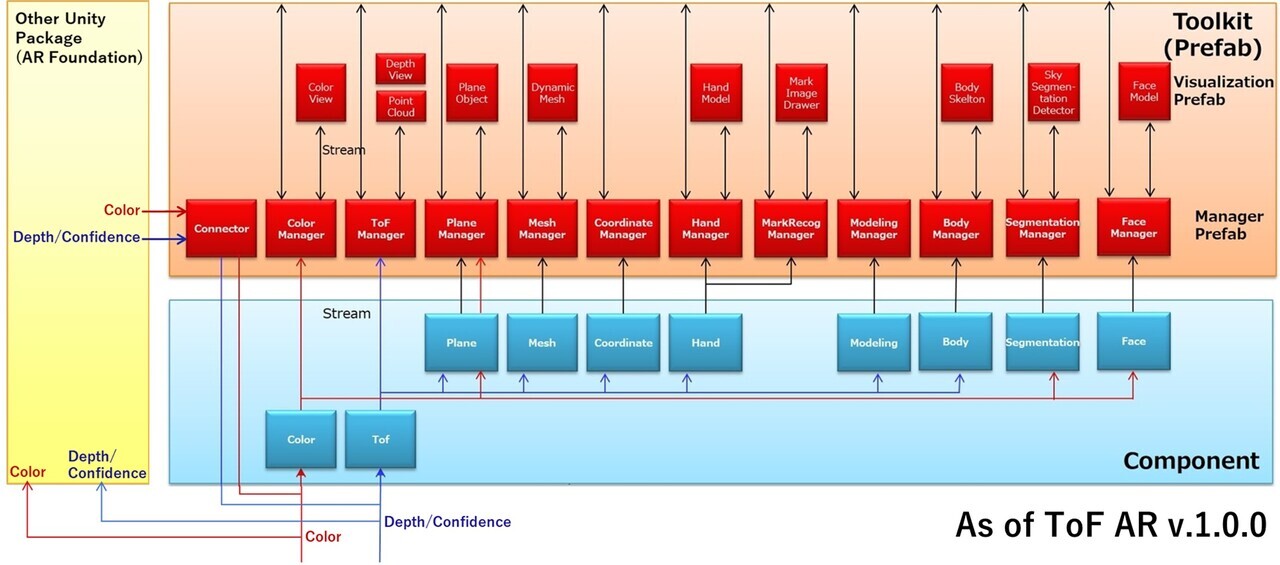
-
Stream
Provides data transfer between Components. The data transferred is different for each Component, for example, Depth data, Color data, Mesh data, and coordinate data of feature points. It can contain multiple data. -
Manager Prefab
Provides access to each Component and its output Stream. To use a Component, obtain a singleton instance of the corresponding Manager Prefab. -
Visualization Prefab
Provides a screen display function for data obtained from Component Streams.
When using ToF AR Toolkit, obtaining an instance of either Color Manager Prefab or ToF Manager Prefab is required. Which one is needed depends on the Component, refer to the Prefab description in the ToF AR reference articles. The reason is that Components other than Color/ToF Component also process Stream from Color/ToF Component.
2.3. Component list
ToF AR consists of Components that have the following functions. Users can use the Components alone or in combination.
| Component | Description | Package |
|---|---|---|
ToF |
Get Depth data,
confidence data, and
PointCloud data |
Base |
Color |
Get RGB color data |
Base |
Mesh |
Get 3D mesh data |
Base |
Plane |
Get plane estimation
data |
Base |
Coordinate |
Depth data, Color data,
Mutual coordinate
conversion function in
3D coordinate space |
Base |
Hand |
Get hand (finger)
position estimation
data |
Base, Hand |
MarkRecog |
Mark recognition |
Base, Hand |
Modeling |
3D Modeling |
Base |
Body |
Body recognition |
Base |
Segmentation |
Segmentation
recognition |
Base |
Face |
Face recognition |
Base |
Package is the required Unity package to import during setup:
-
Base requires
TofAR_Base_xxxx_yyyy.unitypackage -
Hand requires
TofAR_Hand_xxxx_yyyy.unitypackage
Where xxxx is the version number, and yyyy is the build target platform.
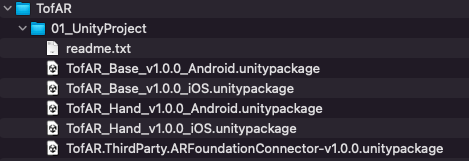
2.4. Package layout
The contents of the ToF AR package are listed below. The package can be placed and used anywhere, at the user’s discretion.
| Folder | Description |
|---|---|
01_UnityProject |
ToF AR Unity package file |
2.5. Unity package internal folder layout
The folder layout when ToF AR has been set up inside Unity is as follows:
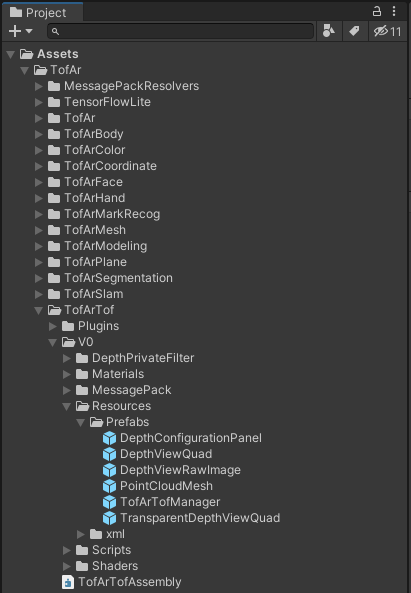
| Folder | Description |
|---|---|
TofAr/TofArXXXX |
One folder per
component. |
TofAr/TofArXXXX/Plugins |
Binary files needed for
the ToF AR to function
properly. |
TofAr/TofArXXXX/V0/Resources |
Various resource
files. |
TofAr/TofArXXXX/V0/Resources/xml |
Setting files needed for
the ToF AR to function
properly. |
TofAr/TofArXXXX/V0/Scripts |
Scripts are stored here. |
3. Setup
This chapter describes how to set up the ToF AR application development environment.
3.1. Setting up or upgrading ToF AR
3.1.1. Set up ToF AR
Set up the ToF AR Unity Toolkit as follows:
-
Create a new project with Unity
The Unity project can be specified at an arbitrary location. -
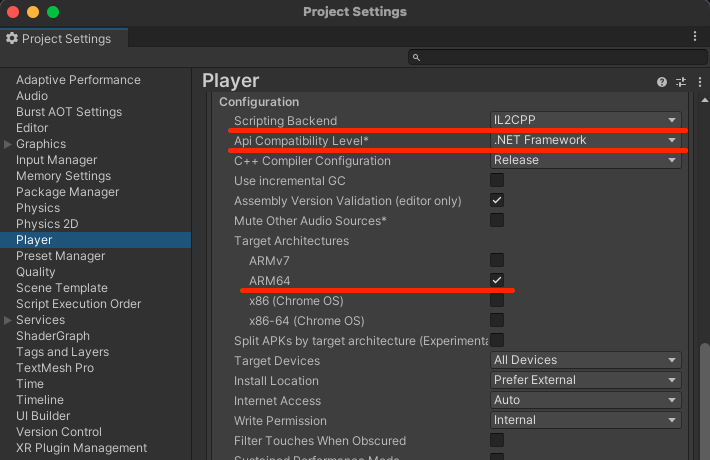
From the menu, open up File / Build Settings… / Player Settings / Android Settings and make the following settings under Other Settings:
-
Api Compatibility Level: .NET Framework ( .NET4.x for versions before Unity2020 ) or .Net Standard 2.1
-
Scripting Backend: IL2CPP
-
Target Architectures: Select only ARM64
-
-
From the menu, select File / Build Settings… / Player Settings / iOS Settings and set the following in Other Settings:
-
Api Compatibility Level: .NET Framework ( .NET4.x for versions before Unity2020 ) or .Net Standard 2.1
-
Camera Usage Description: Enter a string that describes how the camera is going to be used
-
-
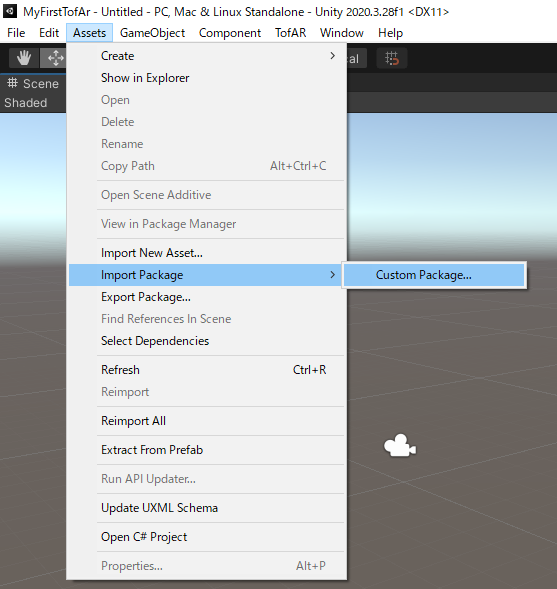
Select Assets / ImportPackage / Custom Package… and import TofAR_Base_xxxx_yyyy.unitypackage, where xxxx is the version number and yyyy is the build target platform.
-
If using the Hand Component also, then import TofAR_Hand_xxxx_yyyy.unitypackage, where xxxx is the version number and yyyy is the build target platform, in the same way.
|
3.1.2. Upgrade ToF AR
To upgrade your installation for existing projects using the ToF AR Unity Toolkit, do as follows:
-
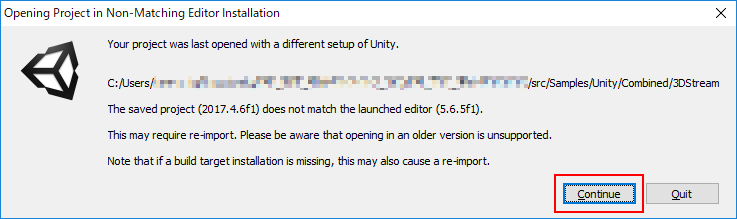
Open the existing project with a Unity version that supports the new ToF AR. A dialogue will appear if a different version of Unity was used prior to this. Press Continue.
-
Delete the TofAr folder from the Project View.
-
Select Assets / ImportPackage / Custom Package… and import TofAR_Base_xxxx_yyyy.unitypackage, where xxxx is the version number and yyyy is the build target platform.
-
If using the Hand Component also, then import TofAR_Hand_xxxx_yyyy.unitypackage, where xxxx is the version number and yyyy is the build target platform, in the same way.
|
3.2. Setting up AR Foundation
3.2.1. Install Packages
Install the following packages from Package Manager of Unity Editor:
-
AR Foundation
-
ARCore XR Plugin (Android)
-
ARKit XR Plugin (iOS)
-
ARCore Extensions for AR Foundation
For more information on AR Foundation, see Getting started with AR Foundation.
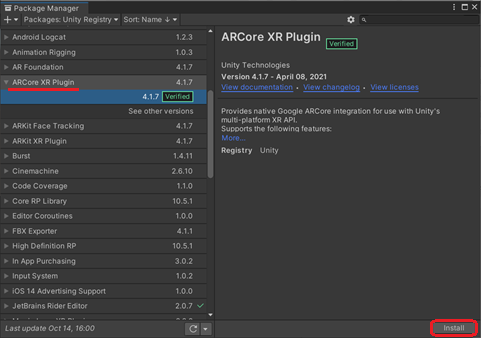
Install AR Foundation and the ARCore XR Plugin
The following describes how to install ARCore as a Plugin for AR Foundation.
-
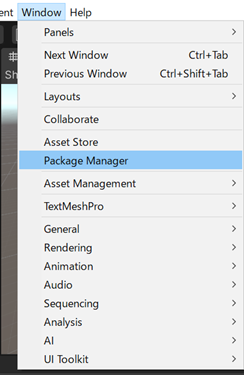
Select Window / Package Manager.
-
Select Packages: Unity Registry.
-
Select AR Foundation from the package list displayed, and then select Install.
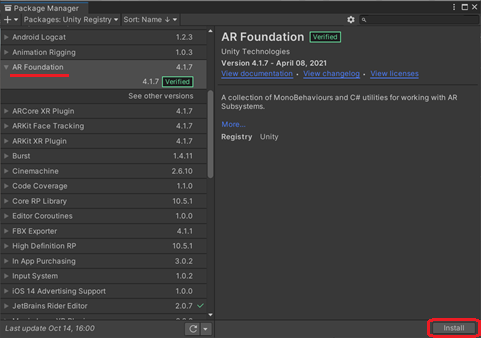
-
Select ARCore XR Plugin from the package list displayed, and then select Install.
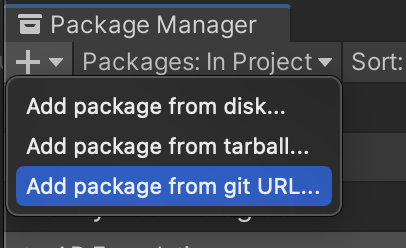
Install ARCore Extensions for AR Foundation
Install ARCore Extensions for AR Foundation as follows:
-
Download arcore-unity-extensions-x.x.x.tgz from Google AR GitHub, or other providers, where x.x.x indicates the software version.
-
Select +, the plus sign, in the Package Manager window, then select Add Package from tarball…, and install arcore-unity-extensions-x.x.x.tgz.
3.2.2. Import the ARFoundationConnector
-
Select Assets-Import Package-Custom Package… and open TofAR.ThirdParty.ARFoundationConnector-vx.x.x.unitypackage, where x.x.x indicates the package version.
-
Click Import in the Import Unity Package window to import the package.
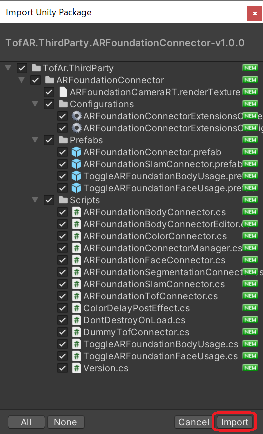
See also Set up ToF AR.
3.2.3. Set up ARCore
To apply ARCore as a Plug-in for AR Foundation:
-
Edit the project file
Assets/Plugins/Android/AndroidManifest.xmlIf the file
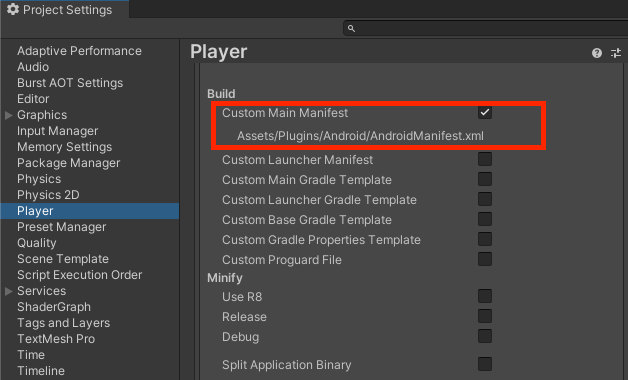
AndroidManifest.xmldoes not already exist, select the CustomMainManifest checkbox under ProjectSettings / Publishing Settings / Build to create it.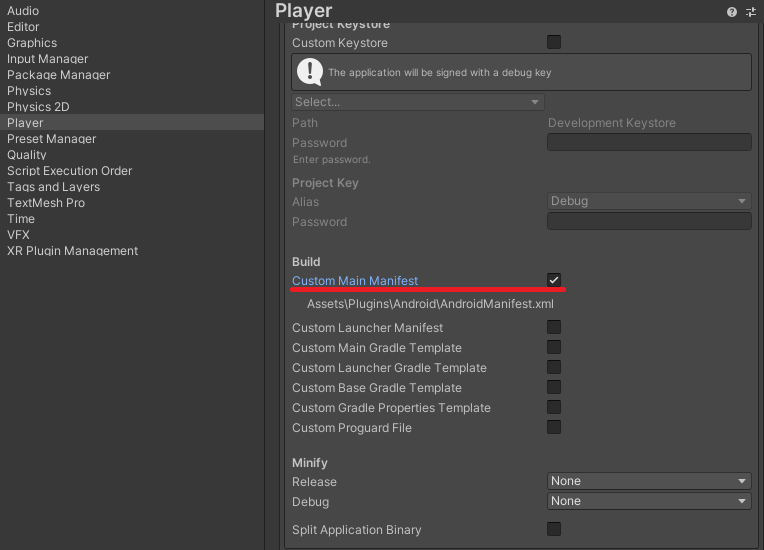
-
In the
<application>tag, setandroid:extractNativeLibs="true".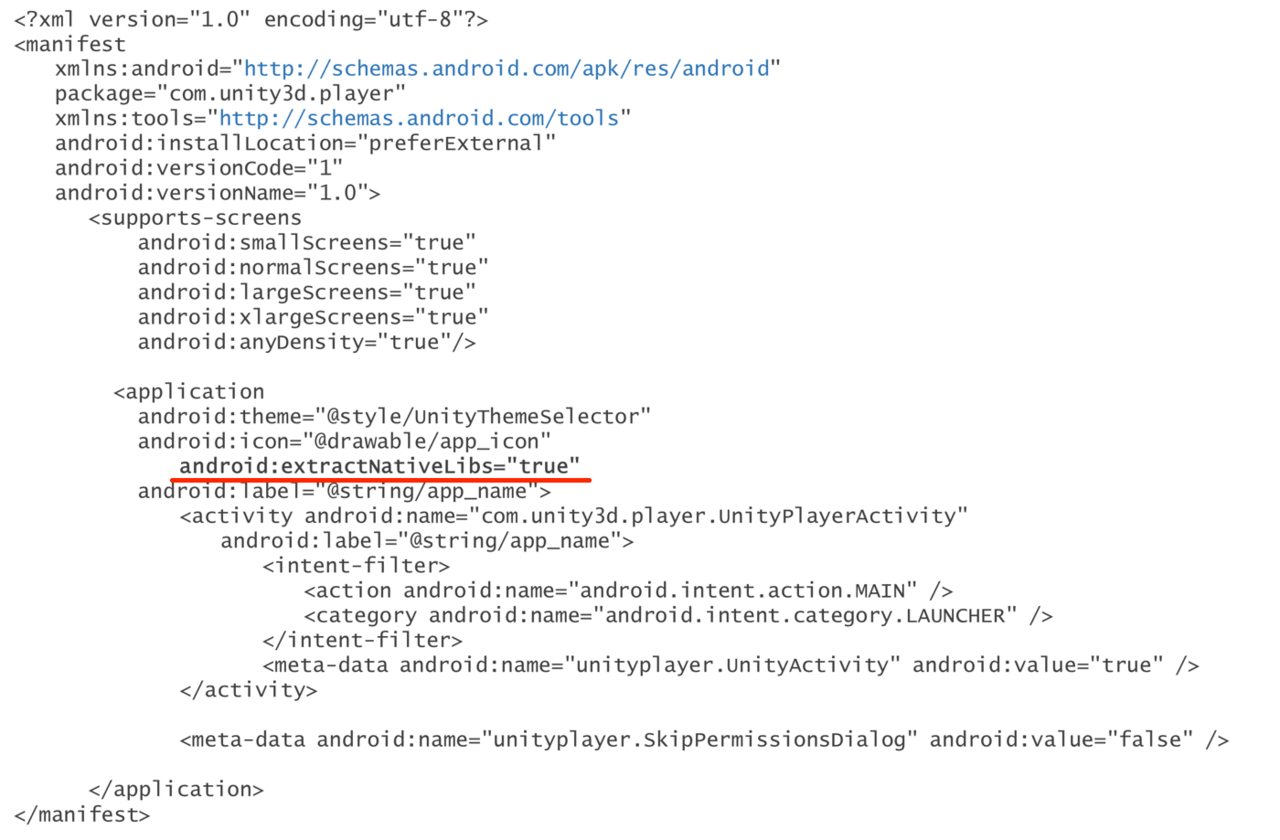
3.3. Build settings for supporting API Level 31 and above of Android SDK Platform
3.3.1. For Unity2021
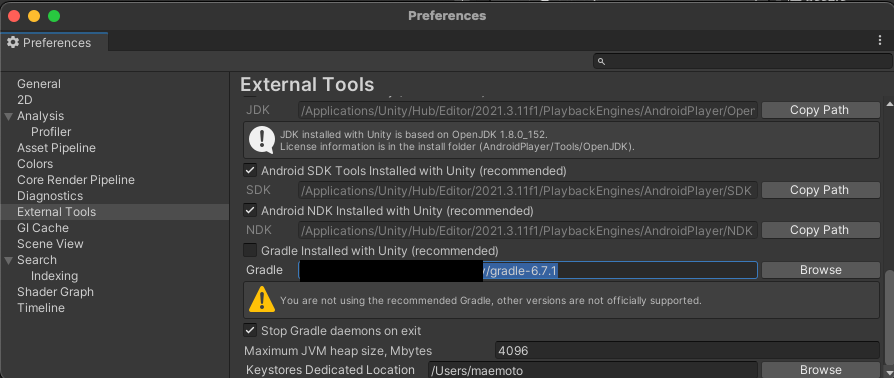
Gradle setup
Gradle 6.7.1 or above must be used in order to support API Level 31 and above of Android SDK Platform.
-
Download and install gradle from https://gradle.org/releases/
-
In Unity, specify the path of the installed gradle in Preferences / External Tools
Change project settings
-
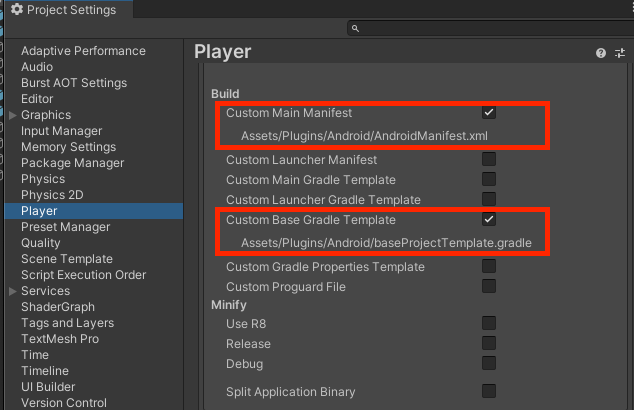
Select the Player Settings / Publishing Settings / Custom Main Manifest and Player Settings / Publishing Settings / Custom Base Gradle Template checkboxes
-
Edit the project file
Assets/Plugins/Android/AndroidManifest.xml -
In the
<application>tag, set the following three<uses-native-library>tags<uses-native-library android:name="libOpenCL.so" android:required="false" /> <uses-native-library android:name="libOpenCL-car.so" android:required="false" /> <uses-native-library android:name="libOpenCL-pixel.so" android:required="false" />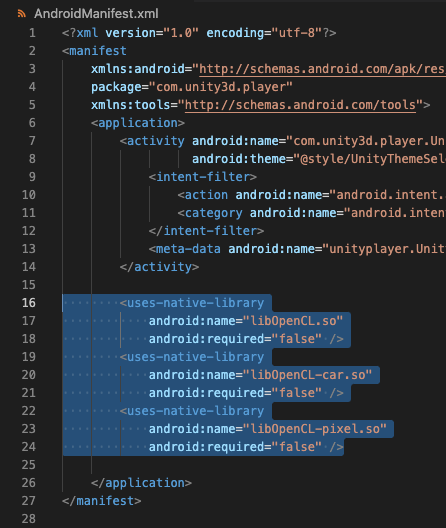
-
Edit the project file
Assets/Plugins/Android/baseProjectTemplate.gradle -
Set the version of
com.android.tools.build:gradle:to 4.2.0 or above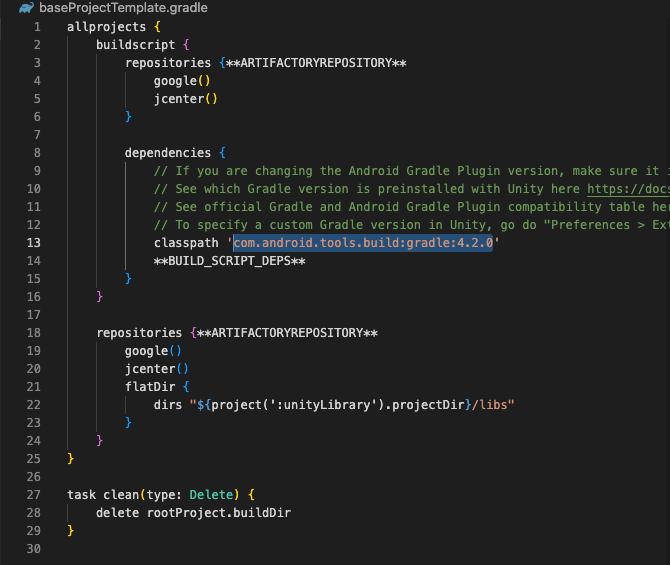
-
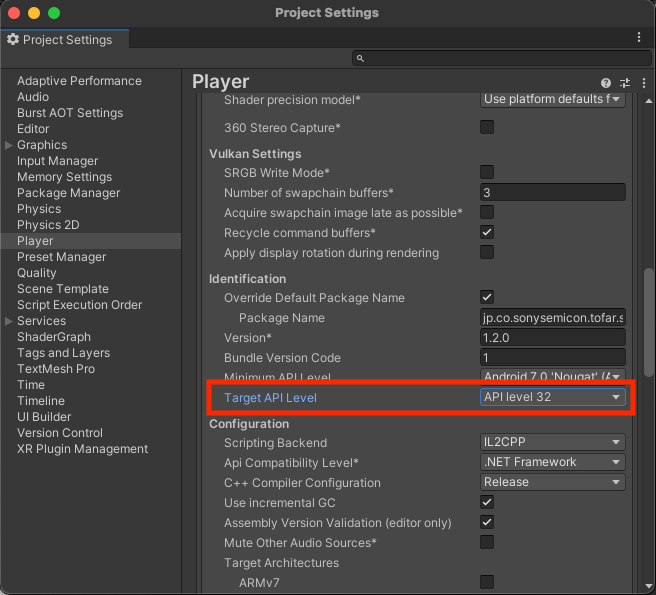
Set Player Settings / Other Settings / Target API Level to 31 or above
3.3.2. For Unity2022
Gradle setup
Gradle 6.7.1 or above must be used in order to support API Level 31 and above of Android SDK Platform.
-
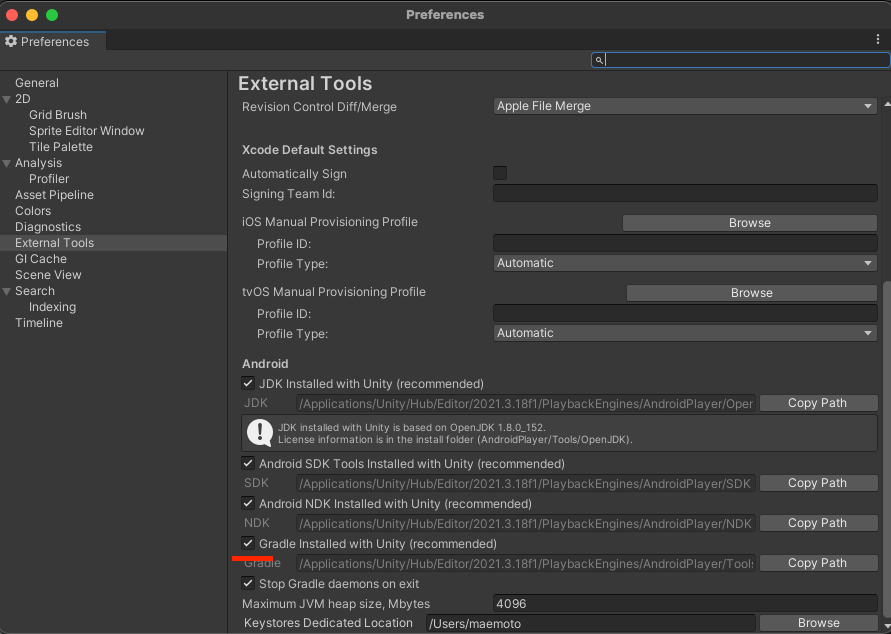
Select the Preferences / External Tools / Gradle Installed with Unity checkbox
Change project settings
-
Select the Player Settings / Publishing Settings / Custom Main Manifest checkbox
-
Edit the project file
Assets/Plugins/Android/AndroidManifest.xml -
In the
<application>tag, set the following three<uses-native-library>tags<uses-native-library android:name="libOpenCL.so" android:required="false" /> <uses-native-library android:name="libOpenCL-car.so" android:required="false" /> <uses-native-library android:name="libOpenCL-pixel.so" android:required="false" />
-
Set Player Settings / Other Settings / Target API Level to 31 or above
3.4. Eliminate TrueDepth API when submitting apps to App Store
There are cases in which submitting apps using
ToF AR to Apple Store is rejected on ground that
"TrueDepth API should be eliminated if it is not used."
Even if creating the apps only using LiDAR
sensor and without TrueDepth camera, the
rejection will be occurred since TrueDepth API
is used inside ToF AR.
It will be resolved by deleting the part of using TrueDepth API below.
-
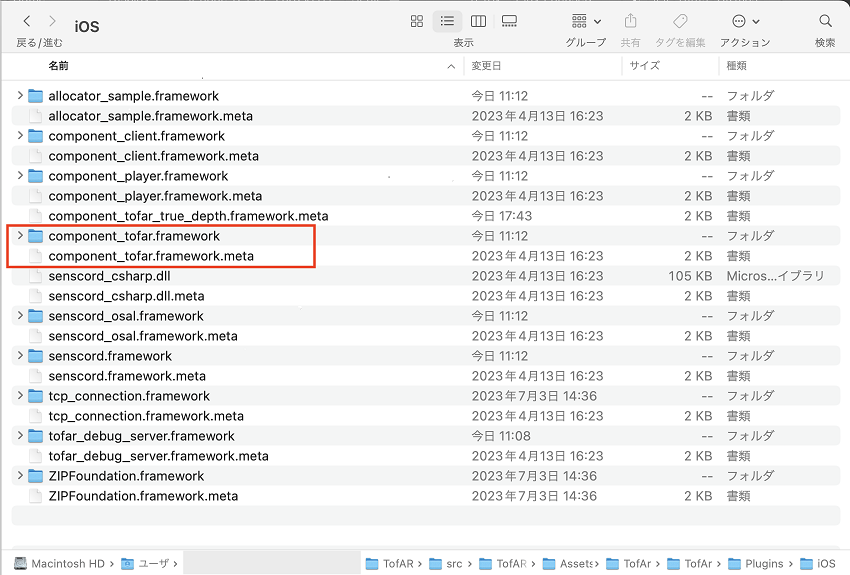
Delete 2 files in Assets/TofAr/TofAr/Plugins/iOS.
-
component_tofar_true_depth.framework
-
component_tofar_true_depth.framework.meta
-
4. Developing applications with ToF AR
-
Access stream data
ToF AR can acquire Raw level stream data, such as image data from RGB or ToF cameras, and Mesh vertex information. This describes the procedure to access the stream data using Manager class.
-
Save and play back stream data
This describes the procedure to save Stream data to a file and play back the Stream data from a file. -
Use AR Foundation
This describes how to set up and debug simultaneous use of AR Foundation and ToF AR. -
Debug with TofARServer
This describes how to debug using TofARServer in connection with an Android device. -
Configure a ToF AR device profile
The standard ToF camera setting in Device Profile of ToF AR is performed automatically. However, manual settings are also possible. This procedure describes how to configure manual profile settings. -
Configure the ToF mode
Some ToF cameras have multiple modes with different ranges of ranging. This describes how to obtain the modes from devices and how to set the modes.
4.1. Access Stream data
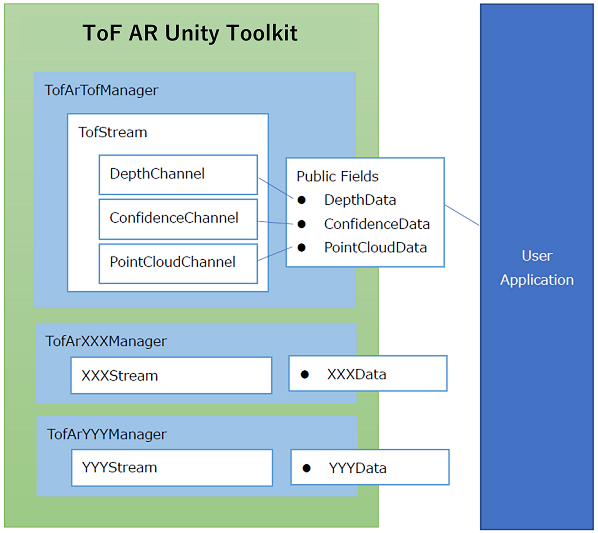
4.1.1. Streams and Channels
An interface is prepared for each Manager class, that can get Raw level data including ToF camera image data and Mesh vertex information via scripts. This flow of data is called a Stream. One or several different types of data can be stored in the Stream, and each is stored in a different channel. The relationships between Manager, Stream, and Channel are shown below. For example, the stream of TofArTofManager has three channels with Depth data, Confidence data, and PointCloud data.
The structure is internal and the application developer can get the latest data at arbitrary timing by referring to the public data field of the Manager class, which is automatically updated from each channel.
4.1.2. Event-driven data access
The following events are prepared for the Manager class, and event-driven data can be handled by registering event handlers.
| EventName | Description |
|---|---|
OnStreamStarted |
Stream has started |
OnStreamStopped |
Stream has stopped |
OnFrameArrived |
New data generated |
4.1.3. Accessing Manager from User Script
The manager can be referred to from anywhere in the script through the Instance field of the Manager class, if the Manager Prefab is instantiated in the scene.
In the case of TofArTofManager, for example:
var instance = TofArTofManager.Instance;4.1.4. Starting and ending the Stream
The StartStream() and
StopStream() methods are
prepared for the Manager class, and streams
can be started and ended at any time.
4.2. Save and play back stream data
4.2.1. Saving stream data
You can save the stream to a file by calling
SetProperty with a given
RecordProperty input
parameter.
RecordProperty input parameter
| Member | Type | Description |
|---|---|---|
Enabled |
bool |
true: Save |
Path |
string |
File save directory path |
Formats |
Dictionary<long, string> |
Data format list |
BufferNum |
int |
Number of buffers |
Sample code
var recordProperty = new RecordProperty()
{
    Enabled = true,
    Path = recordingPath,
    BufferNum = 5
};
var channelInfo = TofArTofManager.Instance.GetProperty<ChannelInfoProperty>();

foreach (var channel in channelInfo.Channels)
{
    recordProperty.Formats[channel.Key] = "raw";
}

TofArTofManager.Instance.SetProperty(recordProperty);
4.2.2. Play back stream data
You can play back saved stream data by
calling StartPlayback(string
path) from the TofArTofManager
and other Manager classes.
Set path to the directory the
saved data is stored in.
For components including Hand and Mesh that
generate data from ToF data, you can
generate data in real time and use it by
first starting the playback of the saved
file in TofArTofManager and then calling
StartPlayback().
Sample code
// playback from saved files.
TofArTofManager.Instance.StartPlayback(path);

// playback from playing Tof data.
TofArHandManager.Instance.StartPlayback();
4.3. Use AR Foundation
4.3.1. ARFoundationConnector
Using ARFoundationConnector, you can simultaneously use the functions of AR Foundation and ToF AR provided by Unity.
ARFoundationConnector is an extension that relays Depth, Color, and Body data output from AR Foundation to ToF AR.
Set up AR Foundation
Refer to Setting up AR Foundation.
Enable ARFoundationConnector
-
Place the TofAr.ThirdParty / ARFoundationConnector / Prefabs / ARFoundationConnector prefab into the scene.
-
In the placed ARFoundationConnector object, set
ARFoundationConnectorManager.autoStartto off (deselect Auto Start).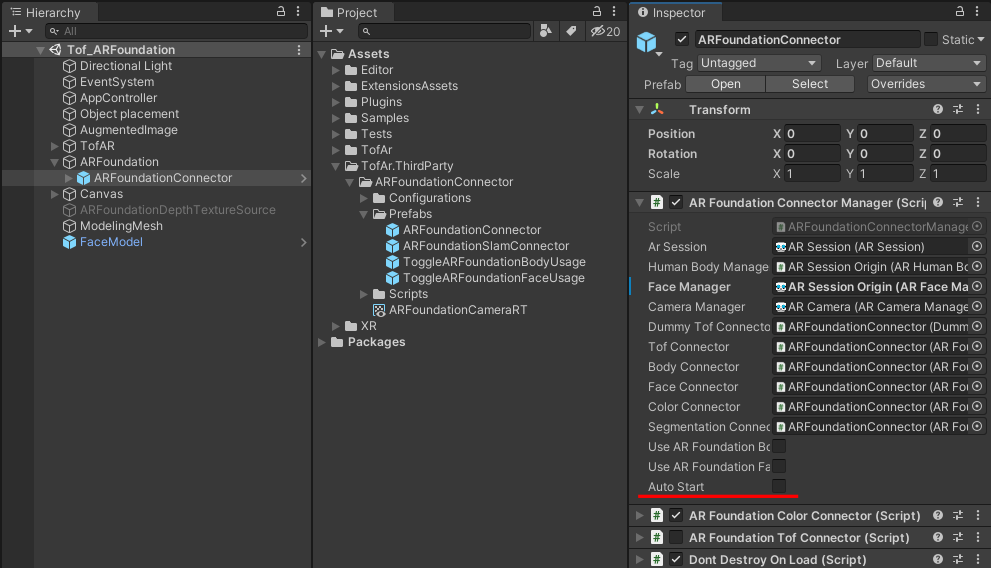
-
If a camera other than ARFoundationConnector / AR Session Origin / AR Camera is in the scene, set the tag of that camera to something other than MainCamera.
-
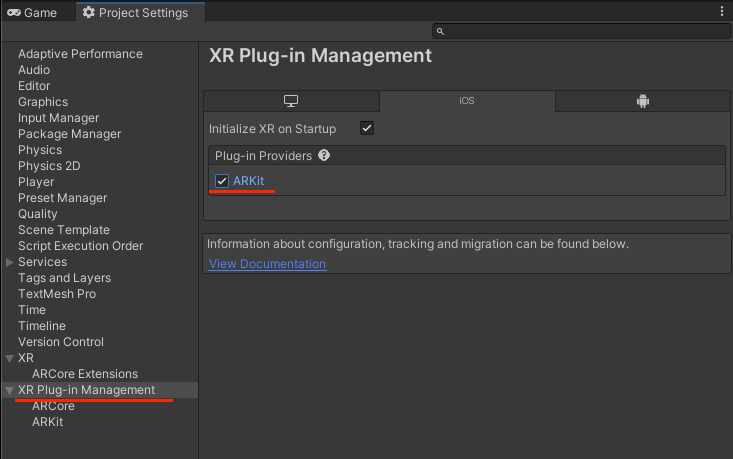
Enable the ARKit plugin in Project Settings / XR Plug-in Management
Prefabs
Prefabs with the following functions are available.
| Prefab | Description |
|---|---|
ARFoundationConnectorManager |
Relay Depth data,
Color data, and
so on, output
from AR
Foundation and
input to ToF
AR. |
ToggleARFoundationBodyUsage |
UI for toggling
the Body
recognition
function of AR
Foundation. |
ToggleARFoundationFaceUsage |
UI for toggling
the Face
recognition
function of AR
Foundation. |
4.3.2. Debugging applications with AR Foundation
4.4. Debug with TofARServer
By executing TofARServer on the device, the data
retrieved from the ToF camera can be used to
debug applications running on Unity
Editor.
| Make sure to use the same ToF AR version of both the Unity Editor toolkit and ToF AR Server. The current version is ToF AR v1.4.0. |
4.4.1. Setting up TofARServer
Environment settings
When using TofARServer on an Android
device, use adb (Android
Debug Bridge) command on a PC where the
Android SDK is installed.
If connection to TofARServer is not possible, select Preference / External Tools in the Unity Editor and make the following settings:
-
Deselect Android SDK Tools Installed with Unity (recommended).
-
Specify the path to the installed Android SDK in the SDK path entry field.
TofARServer build and connection settings
-
Open the TofAR_Server Unity project included in the ToF AR package, and set up ToF AR.
See Set up ToF AR and note that both Base and Hand components are required by TofARServer.If the project is opened before ToF AR is set up, a confirmation message to enter safe mode may appear, depending on your settings. If you start Unity in safe mode, exit safe mode and then import the ToF AR package. -
Build the application and install it to the device.
-
Configure the connection settings between Unity Editor and the device, for example:
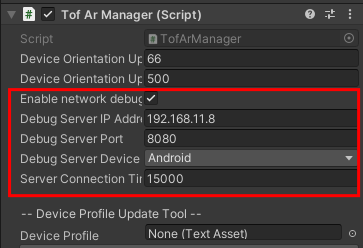
-
Set Debug Server Device to specify the OS of the destination device.
If the OS is Android, then theadb forwardcommand will be automatically executed, and the connection will be set up during play. -
Select or deselect Enable network debugging to switch between network connection (selected) and USB connection (deselected).
-
Set the IP address and port if using a network connection.
-
The communication timeout period can be specified in milliseconds in Server Connection Timeout.
You must restart Unity Editor after changing settings.
-
-
Set the server-side receive port in ToF AR Server by tapping the port number on the ToF AR Server screen to edit it.
You must restart TofARServer after changing settings. 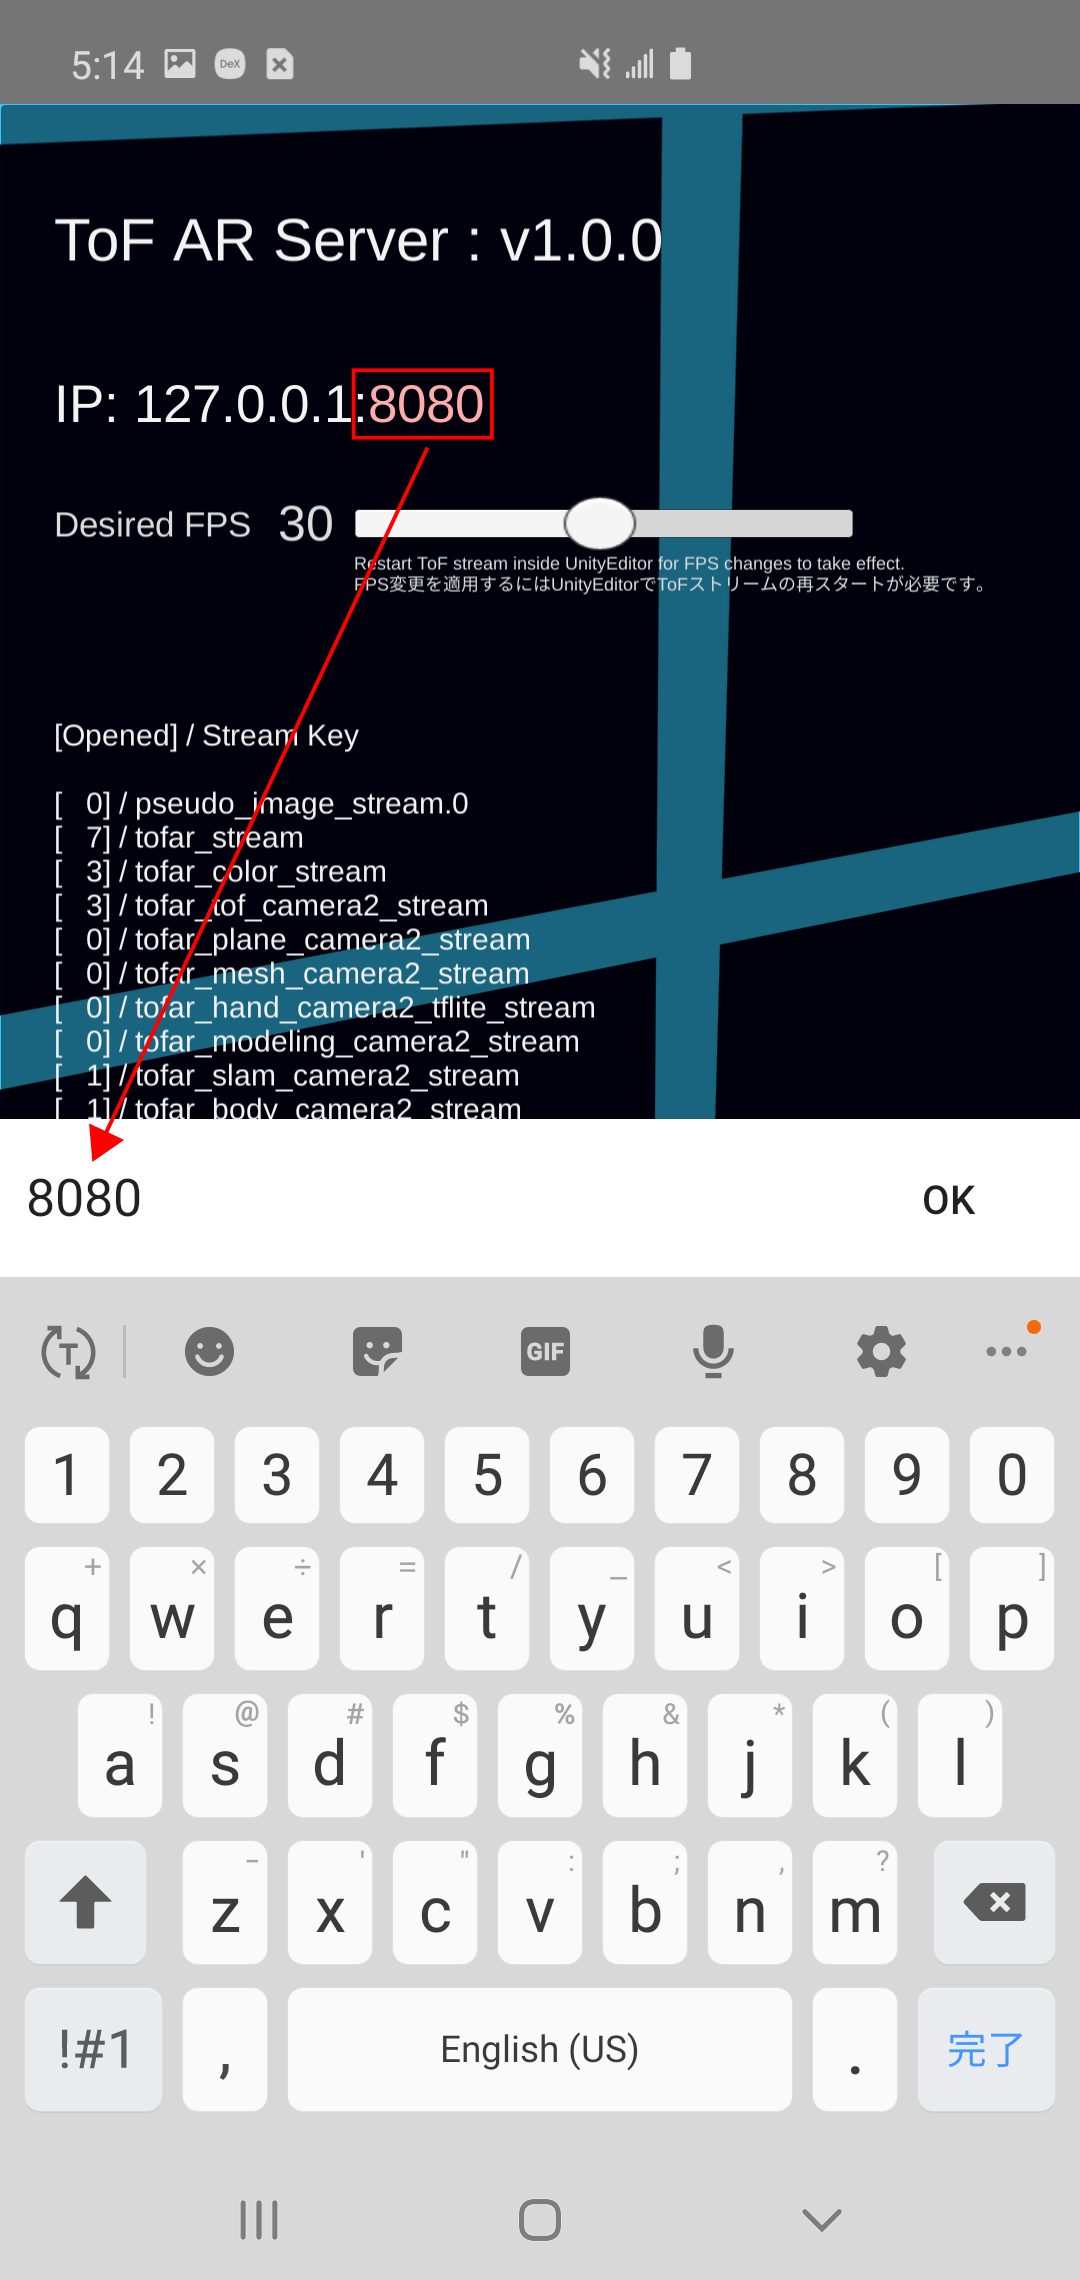
Performing debug
-
Click Play in Unity Editor.
4.4.2. Debugging applications with AR Foundation
Import ARFoundationConnector into TofARServer and build the project, then the applications using the output data by AR Foundation can be executed and debugged on Unity Editor.
Setting up ARFoundationConnector for TofARServer
-
Open the TofARServer Unity project and set up ToF AR and AR Foundation.
-
Setup ARFoundationConnector.
-
Open the
/Assets/Samples/Scenes/Main.unityscene. -
Place
/Assets/TofAr.ThirdParty/ARFoundationConnector/Prefabs/ARFoundationConnectorinto the scene. -
In the placed
ARFoundationConnectorobject, setARFoundationConnectorManager.autoStartto on. -
In the placed
ARFoundationConnectorobject, setDont Destroy On Load (Script)to off (inactive).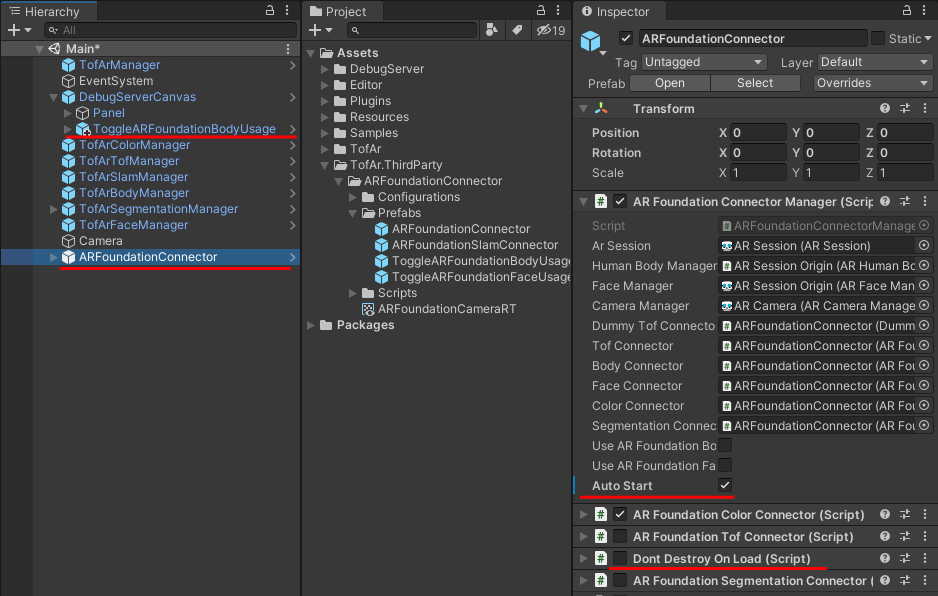
-
If any camera other than
ARFoundationConnector/AR
                                                    Session Origin/AR
                                                    Camera
is in the scene, set the tag of that camera to something other than "MainCamera". -
iOS Only: Place
/Assets/TofAr.ThirdParty/ARFoundationConnector/Prefabs/ToggleARFoundationBodyUsageontoDebugServerCanvaswithin the scene.ToggleARFoundationBodyUsage
UI for toggling the Body recognition function of AR Foundation. -
iOS Only: Assign the
ARFoundationConnectorobject within the scene toToggleARFoundationBodyUsage.ConnectorManagerof the placedToggleARFoundationBodyUsageobject.
-
Place
/Assets/TofAr.ThirdParty/ARFoundationConnector/Prefabs/ToggleARFoundationFaceUsageontoDebugServerCanvaswithin the scene.ToggleARFoundationFaceUsage
UI for toggling the Face recognition function of AR Foundation. -
Assign the
ARFoundationConnectorobject within the scene toToggleARFoundationFaceUsage.ConnectorManagerof the placedToggleARFoundationFaceUsageobject.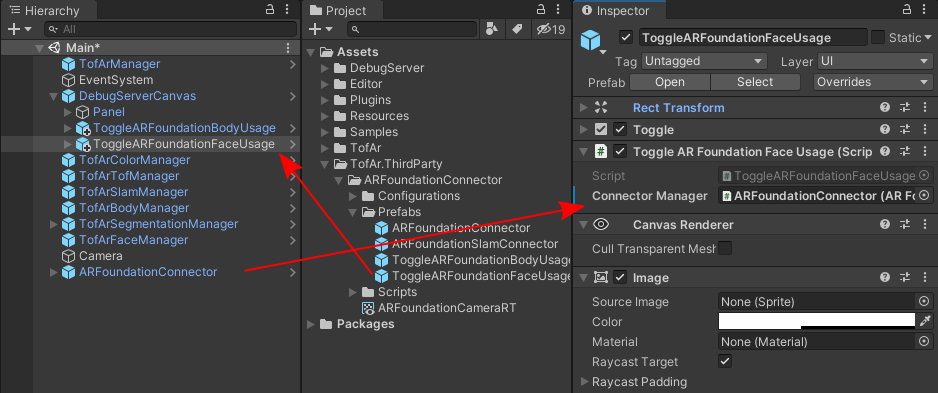
-
iOS Only: Install ARKit Face Tracking package from Unity Package Manager. The version should be the same as the ARKit XR Plugin.
-
Enable the plugin in Project Settings / XR Plug-in Management.
-
iOS Only: Enable FaceTracking in Project Settings / XR Plug-in Management / ARKit.
-
Build the application and install it to the device.
| When debugging, it is necessary to toggle ToggleARFoundation from the TofARServer screen added from this procedure before executing Play in the Unity Editor. |
4.5. Configure a ToF AR device profile
4.5.1. Configuring a ToF AR Device
ToF AR defines ToF camera specific settings on the device. Standard configurations are automatically applied, but in the case of special configurations, the configuration file can be written to the device as follows:
-
Connect the device and PC via USB. USB debugging must be available on the device.
-
Open the project that uses ToF AR in Unity.
-
Open TofArManager in the Inspector.
-
Assign the appropriate configuration file to Device Profile.
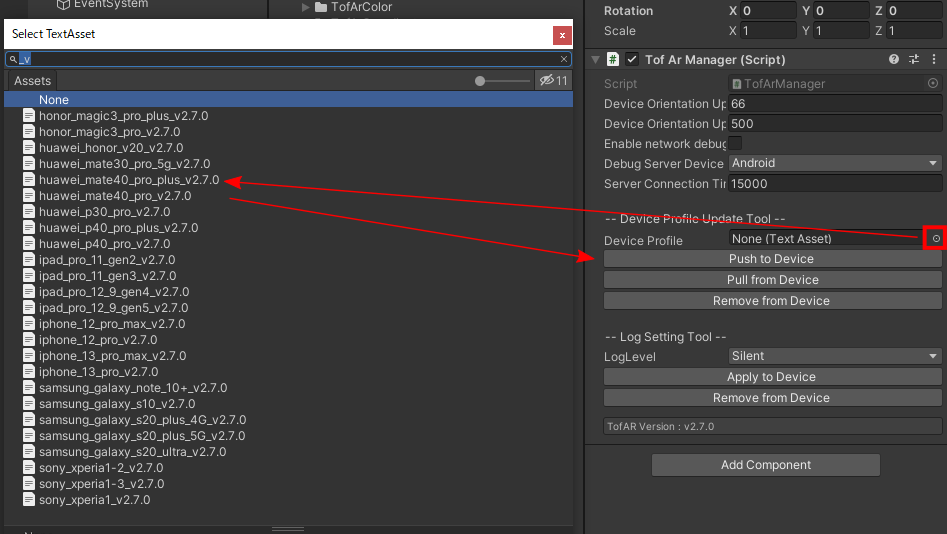
Configuration files are stored inside the TofAr\TofAr\V0\Resources\DeviceProfilesdirectory within the Unity project. -
Select Push to Device.
4.6. Configure the ToF mode
4.6.1. Configuring the ToF Mode
ToF cameras can have multiple modes, which you can get and set from the properties of TofArTofManager.
4.6.2. Getting a List of ToF Modes
Obtain the list of ToF modes using
CameraConfigurationsProperty’s
GetProperty().
The necessary size for
bufferSize depends on the ToF
camera, but we recommended setting this in
intervals of 8192.
For example:
var configurations =
                                        TofArTofManager.Instance.GetProperty(new
                                        CameraConfigurationsProperty(),
                                        8192);
4.6.3. Changing the ToF Mode
Change the ToF mode by setting
SetConfigrationIdProperty.uid to the uid
previously obtained from the ToF mode info,
and using SetProperty().
For example:
TofArTofManager.Instance.SetProperty(new
                                        SetConfigurationIdProperty() { uid =
                                        TargetUID });
5. Tutorials
This chapter includes the following tutorials:
|
In these tutorials, Unity 2021.3.31f1 is used to create the application. Different versions of Unity may have some differences, for example, in the Unity Editor interface. |
-
Application displaying Depth image by ToF AR Unity Toolkit
Through the development of a Depth image display application with ToF AR Unity Toolkit, the flow from application creation to debugging is described. -
Application using Plane detection of AR Foundation (ARCore) and Hand detection of ToF AR
This tutorial describes creating an application to place a cube on a plane detected by AR Foundation, and then operate the cube with Hand of ToF AR. By creating this application, the implementation method using ARFoundationConnector, which is necessary for simultaneously using AR Foundation (ARCore) and ToF AR functions, is described. -
Application to display PointCloud data by Particle System
This tutorial describes creating an application for displaying PointCloud data acquired by ToF AR, by Particle System in Unity. While creating this application, methods using ToF AR data and Toolbar provided in TofAR_Samples_Basic are described.
5.1. Application displaying Depth image by ToF AR Unity Toolkit
The ToF AR Unity Toolkit comes with a set of Prefabs that can be used to develop applications efficiently. Creating applications to use the basic functions of ToF cameras becomes easier by combining these Prefabs.
This tutorial shows an example of how to create an application that displays the Depth image data from a ToF Camera on the screen, using the ToF AR Unity Toolkit.
Through this procedure, the flow from application creation to debugging is described in the following subsections:
-
Creating the application
Basic usage of ToF AR Manager Prefab. -
Executing the application on a mobile device
Confirming operations of the ToF AR application on a mobile device. -
Debugging the application
Debugging the ToF AR application with Unity Editor on a mobile device.
5.1.1. Creating the application
Create applications with Unity Editor.
Preparation
Make sure that ToF AR is already set up in the Unity project, see Set up ToF AR.
| The Hand component is not applied in this tutorial, so installation of the Hand Component package is not required. |
Procedure
Instantiate TofArManager and TofArTofManager
TofArManager is a class that provides commonly used functions in ToF AR. It is defined as a Prefab. It is always required for applications that use ToF AR.
TofArTofManager is a class that manages the connection with device and is defined as Prefab. It acquires data, such as Depth data and Confidence data, from the ToF camera.
-
Drop
TofAr/TofAr/TofArManagerfrom the Project window to the Hierarchy window.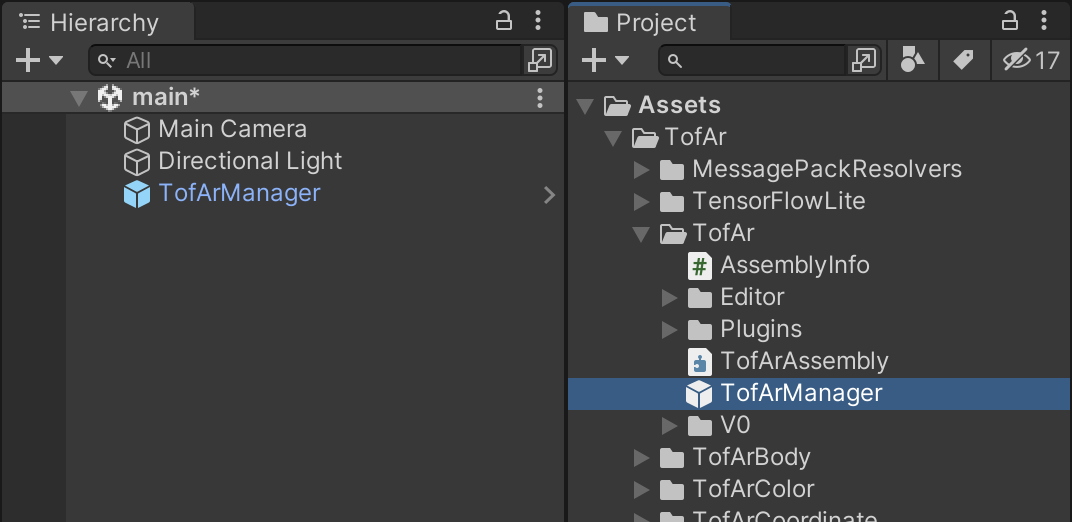
-
Drop
TofAr/TofArTof/TofArTofManagerfrom the Project window to the Hierarchy window.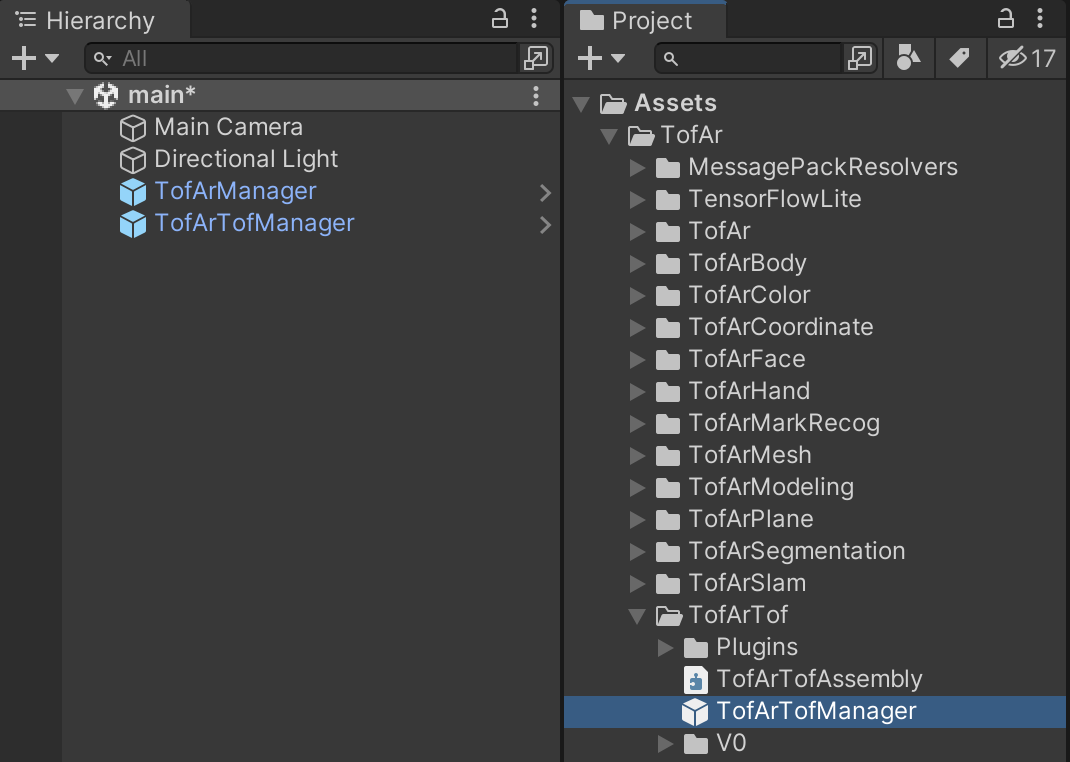
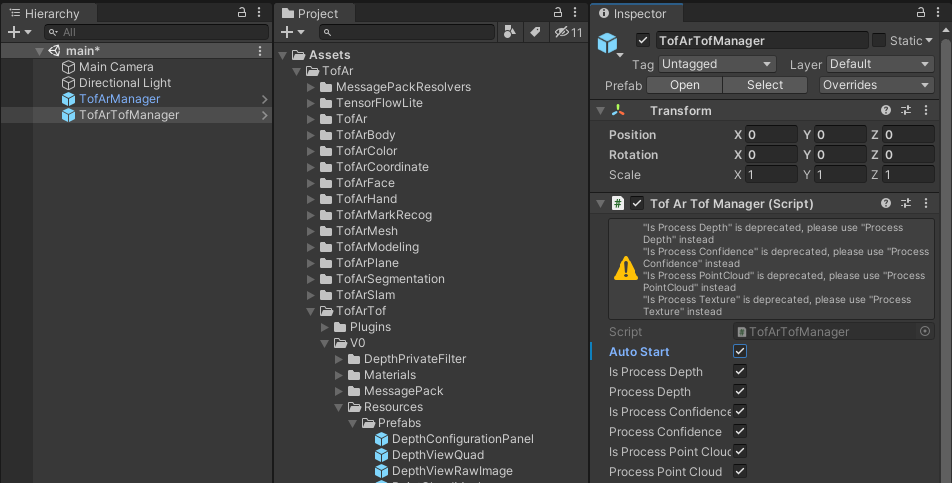
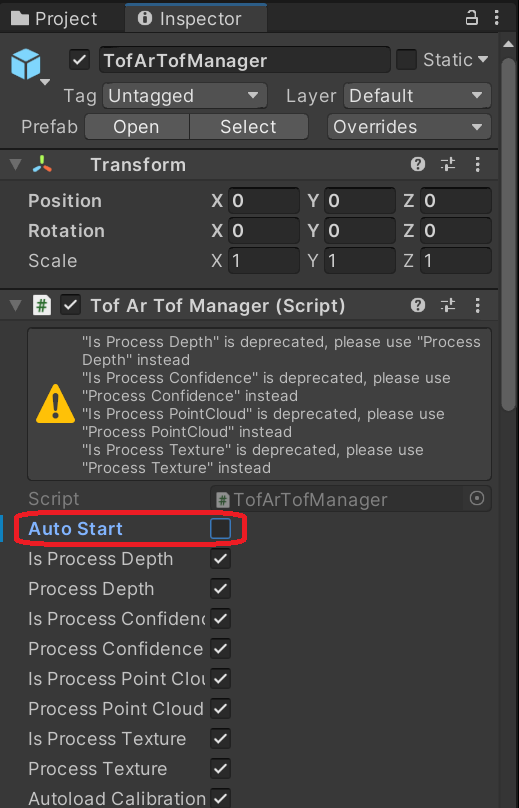
Set properties of TofArTofManager
Set TofArTofManager to start acquiring data from the ToF camera automatically when the application is started.
-
Select TofArTofManager in the Hierarchy window.
-
Select Auto Start in the Inspector window.
Set up the visualization of the acquired data
Instantiate
DepthViewRawImage to
display the acquired data.
DepthViewRawImage is a
class that automatically displays
the Depth data and is defined as a
Prefab.
When placed in the scene, it
accesses the Stream of the
TofArTofManager instance, which is a
singleton, to acquire Depth data,
and automatically links to the
start/end of the TofArTofManager
Stream to display it.
-
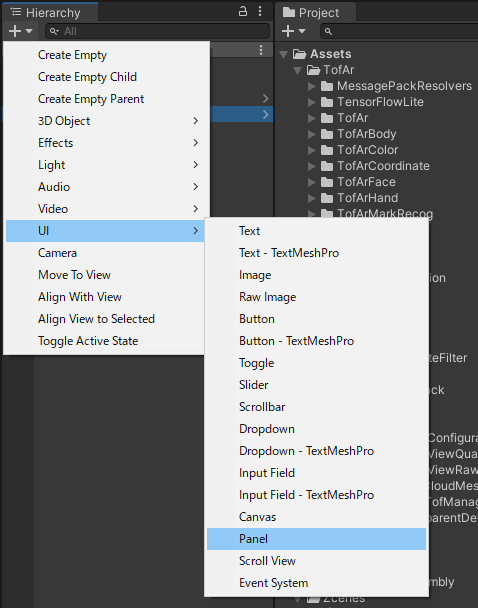
Select UI / Panel from the Create menu in the Hierarchy window. A Panel will be instantiated and placed under the Canvas.
-
Select Panel in the Hierarchy window.
-
In the Inspector window, set Anchor Presets of Rect Transform so that Panel covers the whole screen. By default, the display is set to full screen.
-
Drop
TofAr/TofArTof/V0/Resources/Prefabs/DepthViewRawImagefrom the Project window onto Panel in the Hierarchy window. This will add DepthViewRawImage as a child object of the Panel.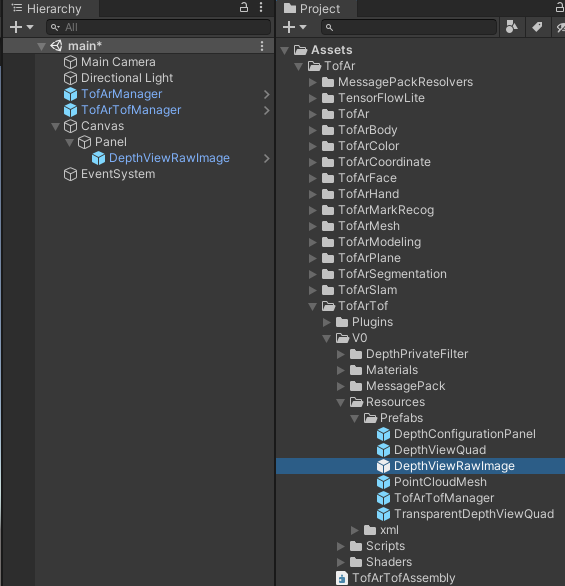
-
Select DepthViewRawImage in the Hierarchy window.

-
If necessary, use Rect Transform and other tools in the Inspector window to modify the display layout of the image.
5.1.2. Executing the application
Build the application into a format that can be executed on the target device, then install the executable file on the device, and execute it.
Preparation
Connect the development PC to the target device via USB.
Procedure
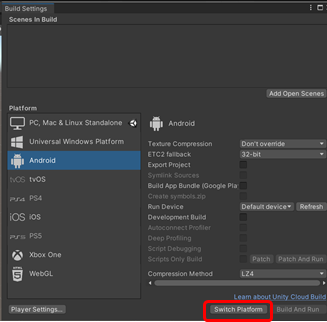
Select a device to execute the application
-
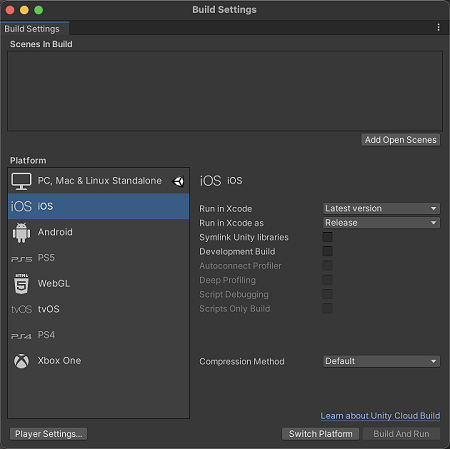
Select File / Build Settings… to open the Build Settings window.
-
Select the platform (OS) of the target device to run the application, either Android or iOS, and then select Switch Platform.

Configure the application package settings
-
Select Player Settings….
-
Make any settings required for the application package you created, such as Package Name, under PlayerSettings in the Inspector.
Execute the application
-
Click Build And Run to build the application, and install it on the device.
At this time, for Android, the application will be installed directly on the device. For iOS, however, an Xcode project will be output. Make settings, such as Application signature, in Xcode, and then click Build And Run.
-
When the installation is completed, the application will be executed on the device.
5.1.3. Debugging the application
ToF AR can run and debug applications on Unity Editor by connecting a PC (Windows 10 or macOS 11) and the target device via USB or network. In this case, building the application is not necessary.
| In this section, debugging the application for Android devices is described. |
Preparation
Connect the development PC to the target device via USB, and make sure that the device is set to enable USB debugging.
Environment settings
When using TofARServer on an Android
device, use the adb
(Android Debug Bridge) command of
the Android SDK installed on the
PC.
If connection to TofARServer is not possible, check under External Tools in the Preference menu of Unity Editor and make the following settings:
-
Deselect Android SDK Tools Installed with Unity (recommended).
-
Specify the path to the installed Android SDK in the SDK path entry field.
Connection settings
-
In the Inspector of TofArManager, configure the connection settings between Unity Editor and the device, for example:
-
Set Debug Server Device to specify the OS of the destination device.
If the OS is Android, then theadb forwardcommand will be automatically executed, and the connection will be set up during play. -
Select or deselect Enable network debugging to switching between network connection (selected) and USB connection (deselected).
-
Set the IP address and port if using a network connection.
-
The communication timeout period can be specified in milliseconds in Server Connection Timeout.
You must restart Unity Editor after changing settings.
-
-
Set the server-side receive port in ToF AR Server by tapping the port number on the ToF AR Server screen to edit it.
You must restart TofARServer after changing settings.
Procedure
Perform debugging in Unity Editor
-
Click Play in Unity Editor.
By connecting the TofARServer Stream, running on the device, and the Application Stream running on Unity Editor, the application can obtain the image data. This connection makes debugging while acquiring data from the device possible.
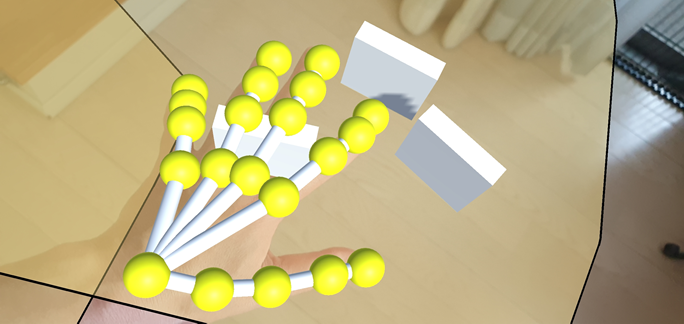
5.2. Application using Plane detection of AR Foundation (ARCore) and Hand detection of ToF AR
Using ARFoundationConnector, we can create applications using AR Foundation functions provided by both Unity and ToF AR functions.
This tutorial describes a procedure to create applications on Android with the following functions:
-
Detect a plane using AR Foundation functions, and display the detected plane on the screen.
-
Display a cube at the position on the detected plane displayed on the screen.
-
Recognize hands displayed on the screen by ToF AR functions, and display Skelton hands for them.
-
Touch, tilt, and move the cube placed on the plane using the Skeleton hands.
5.2.1. Build settings
Configure the environment for the application build.
Preparation
Make sure that ToF AR package is set up in this Unity project.
To set it up, see Set up ToF AR.
Make sure that AR Foundation package is set up in this Unity project. To set it up, see Setting up AR Foundation.
Procedure
Select a device to execute the application
-
Select File / Build Settings… to open the Build Settings window.
-
Select the platform (OS) of the target device to run the application. For this tutorial, select Android, and then select Switch Platform.
Configure the build settings
-
Select Player Settings… in the Build Settings window.
-
Select Player settings in the Project Settings window to configure the following settings.
-
If Vulkan is displayed under Other Settings / Graphics APIs, then select Vulkan and delete it by clicking -.
ARCore does not support Vulkan. 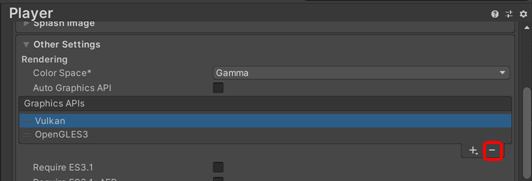
-
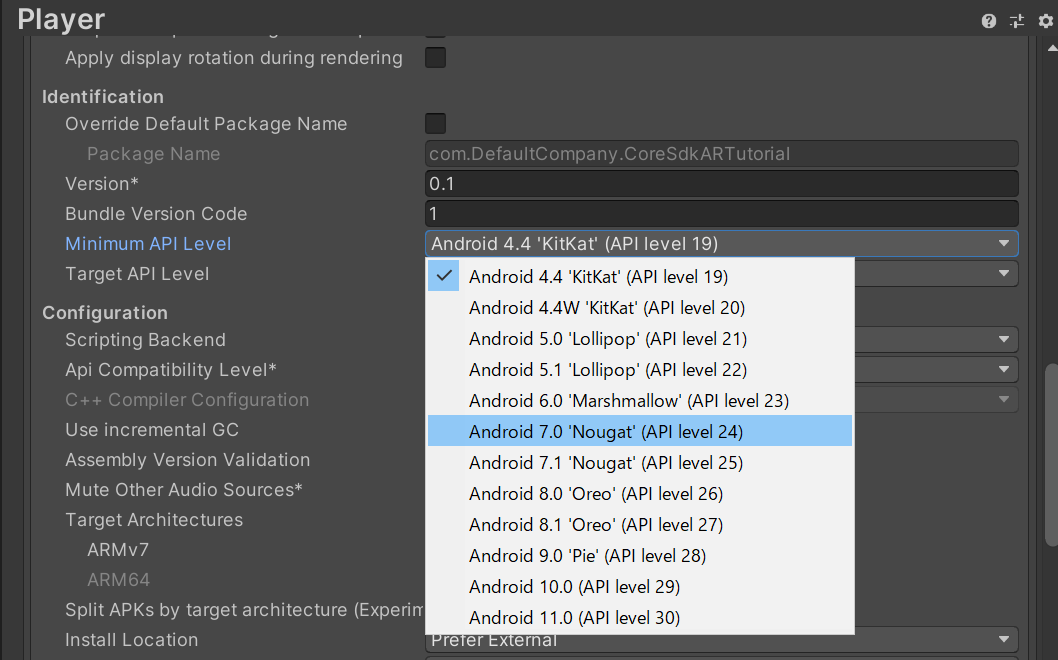
Set Other Settings / Identification / Minimum API Level to "Android 7.0" or a higher version.
-
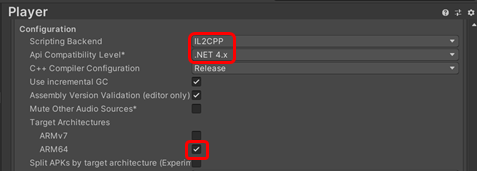
Set Other Settings / Configuration / Scripting Backend to "IL2CPP".
-
Set Other Settings / Configuration / API Compatibility Level to ".NET 4.x".
-
Under Other Settings / Configuration / Target Architectures, select "ARM64".
-
Select Publishing Settings / Build / Custom Main Manifest. As a result, the
Assets\Plugins\Android\AndroidManifest.xmlfile is automatically generated.-
Edit the generated
AndroidManifest.xmlfile and set attributeandroid:extractNativeLibs="true"in the<application>tag.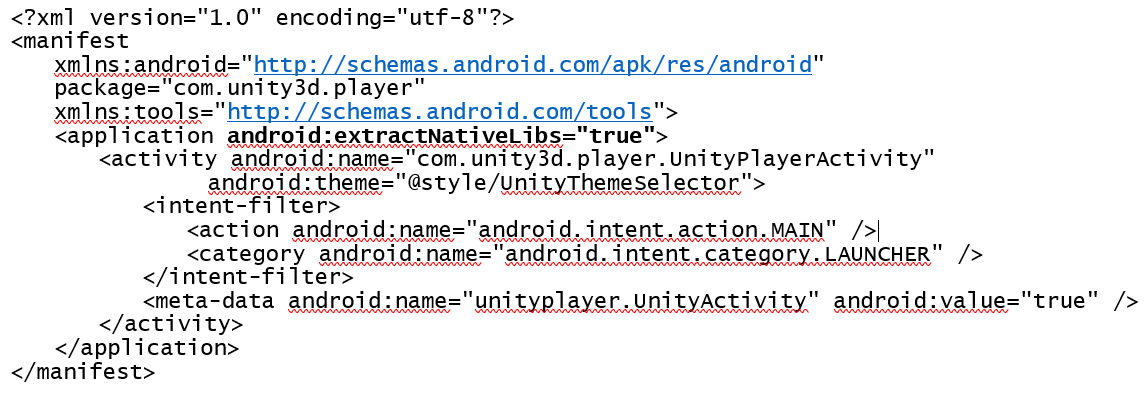
-
-
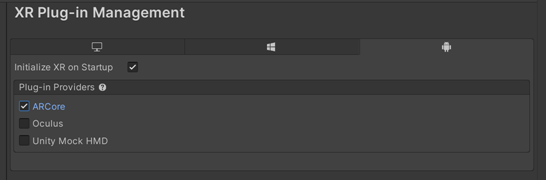
Under XR Plug-in Management in the Project Settings window, select ARCore.
5.2.2. Creating the application
Create an application with AR Foundation and ToF AR on Unity Editor.
The part of this tutorial under Deploy AR Foundation Prefabs and scripts with ARFoundationConnector describes the simultaneous use of AR Foundation and ToF AR. By deploying AR Foundation Prefabs and scripts under AR Session Origin of ARFoundationConnector, AR Foundation and ToF AR functions can be used simultaneously.
Preparation
Make sure that ToF AR and AR Foundation packages are set up in this Unity project.
Procedure
Deploy ToF AR Manager Prefabs
TofArManager is a class that provides commonly used functions in ToF AR and is defined as a Prefab. TofArManager is always required for applications that use ToF AR.
-
Deploy
TofAr/TofAr/TofArManagerfrom the Project window onto the scene in the Hierarchy window.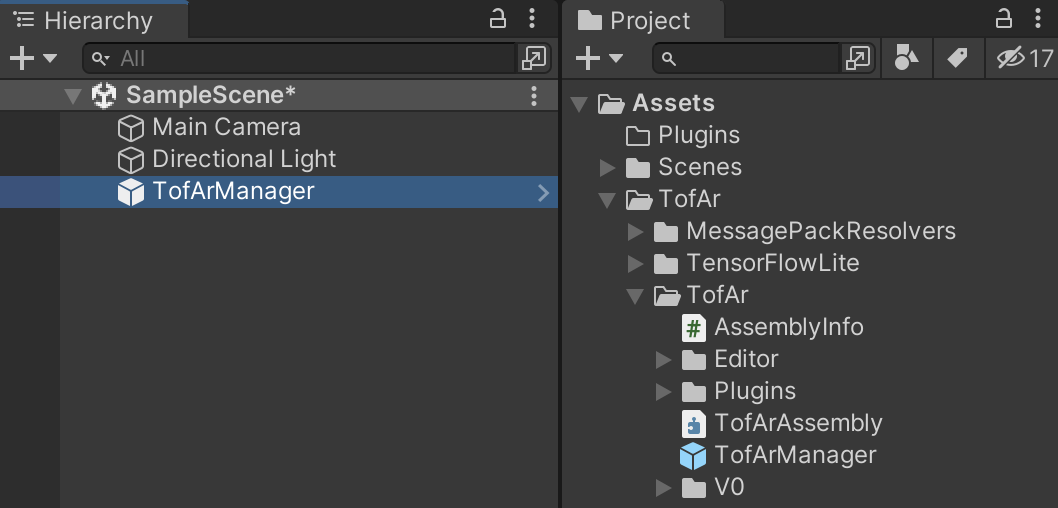
-
Deploy
TofAr/TofArTof/TofArTofManagerfrom the Project window onto the scene in the Hierarchy window. TofArTofManager is a class that manages the connection with device. -
Deploy
TofAr/TofArColor/TofArColorManagerfrom the Project window onto the scene in the Hierarchy window. TofArColorManager is a class that manages the connection with RGB camera. -
Deploy
TofAr/TofArHand/TofArHandManagerfrom the Project window onto the scene in the Hierarchy window. TofArHandManager is a class that manages the connection with ToF AR Hand Components.
Deploy AR Foundation Prefabs and scripts with ARFoundationConnector
Use ARFoundationConnector to use ToF AR functions and AR Foundation functions provided by Unity at the same time.
-
Deploy
TofAr.ThirdParty/ARFoundationConnector/Prefabs/ARFoundationConnectorfrom the Project window onto the scene in the Hierarchy window.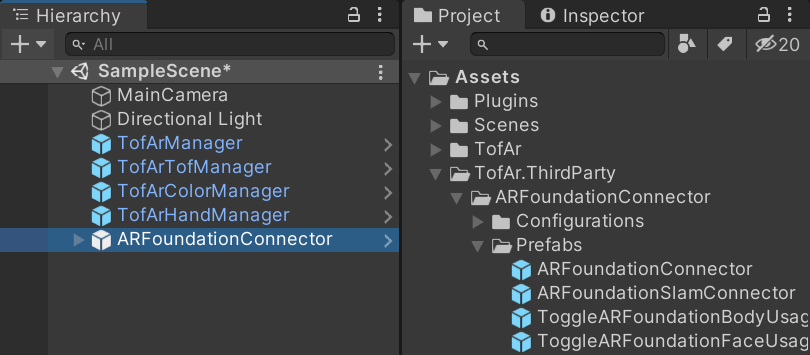
-
Deselect Auto Start of ARFoundationConnectorManager, to turn it off, in the Inspector window of the deployed ARFoundationConnector.
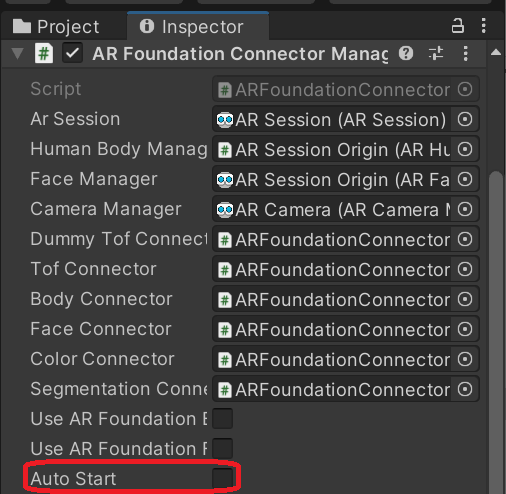
-
Delete Main Camera in the Hierarchy window, because ARFoundationConnector supports AR Camera.
By adding the AR Plane Manager Component to AR Session Origin under ARFoundationConnector, detecting the AR plane becomes possible.
-
Select AR Session Origin in the Hierarchy window.
-
Select Add Component at the bottom of the Inspector window. The Search window is displayed.
-
Search for AR Plane Manager, select it, and add it.
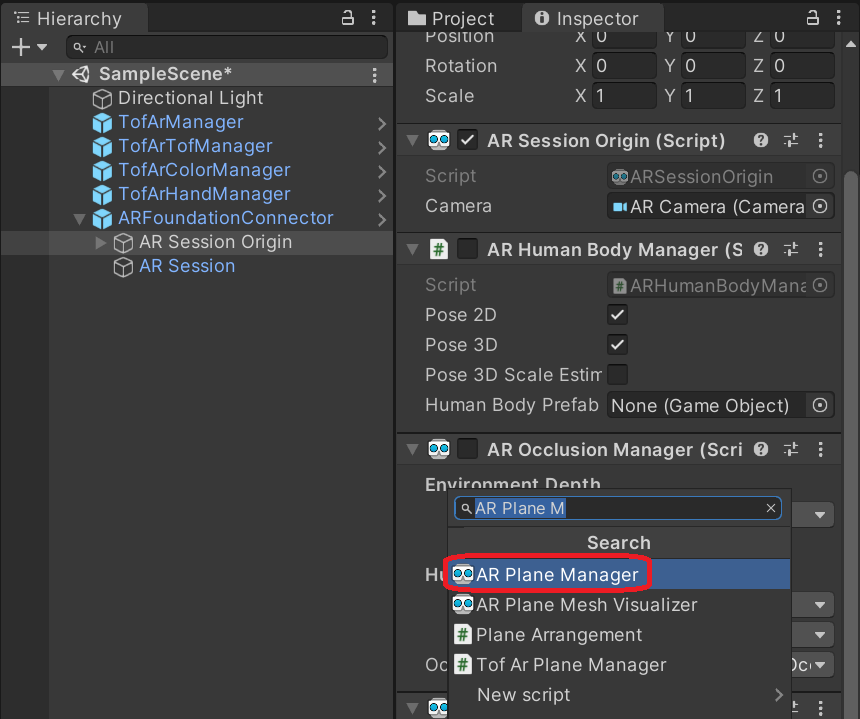
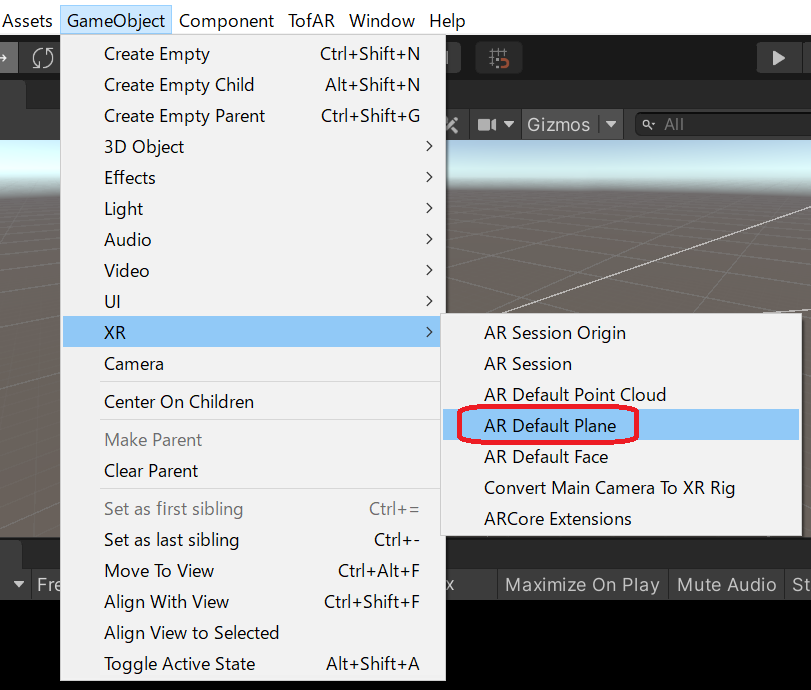
By setting AR Default Plane to AR Plane Manager, the AR plane will be displayed when an AR plane is detected.
-
Create a Prefabs folder inside the Assets folder displayed in the Project window.
-
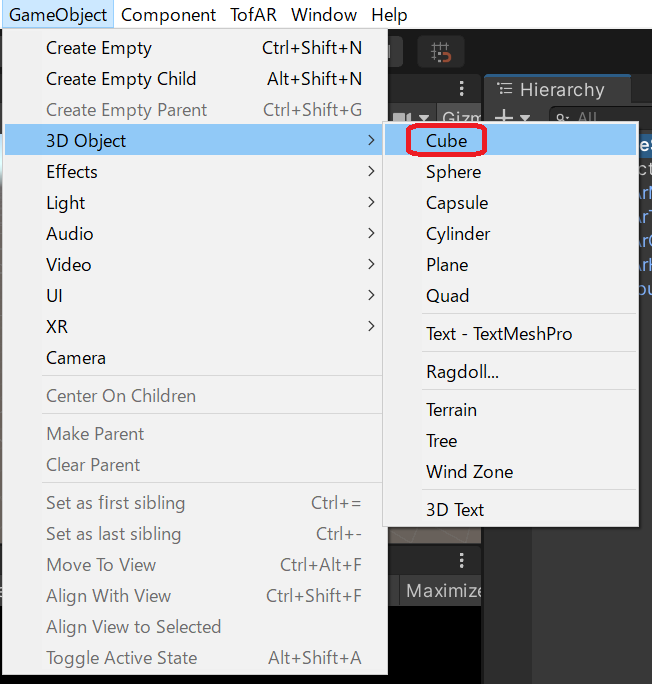
Select GameObject / XR / AR Default Plane from the top menu of Unity Editor, and add it to the scene in the Hierarchy window.
-
Deploy AR Default Plane from the Hierarchy window to the Prefabs folder, to convert it to a Prefab.
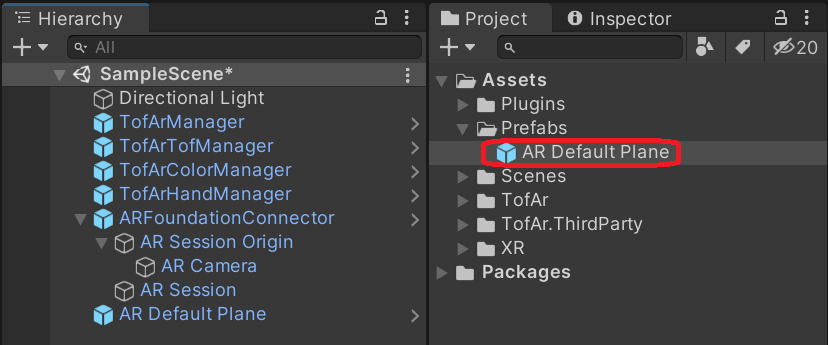
-
Delete the original AR Default Plane from the Hierarchy window.
-
Select AR Session Origin in the Hierarchy window. Drag the AR Default Plane Prefab created in the previous steps, and set the Prefab to Plane Prefab for AR Plane Manager displayed in the Inspector window.

-
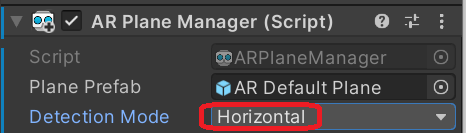
Set Detection Mode of AR Plane Manager to Horizontal in the Inspector window.
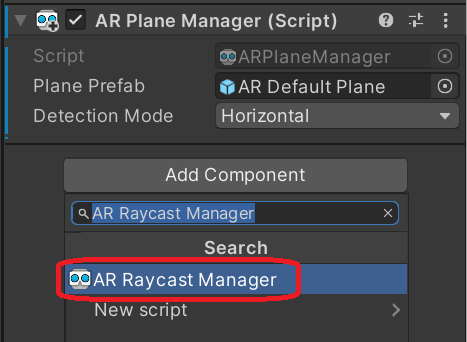
Use AR Raycast Manager to identify the position on AR plane touched on the screen.
-
Select AR Session Origin in the Hierarchy window.
-
Select Add Component at the bottom of the Inspector window. The Search window is displayed.
-
Search for AR Raycast Manager, select it, and add it.
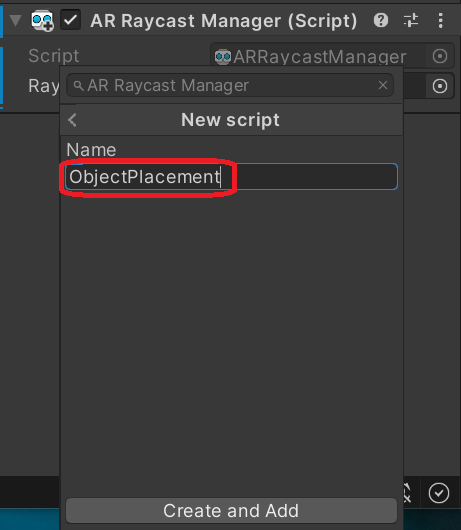
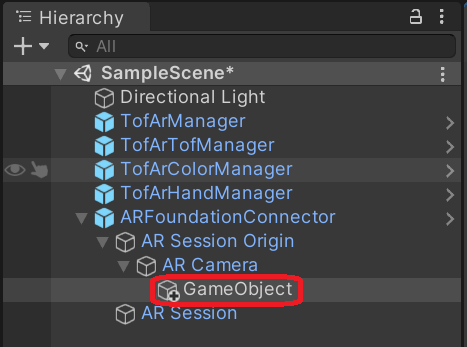
Create a C# script to place a Cube at the position on the AR plane touched on the screen, and add the script to AR Session Origin as a Component.
-
Create a Scripts folder inside the Assets folder displayed in the Project window.
-
Select AR Session Origin in the Hierarchy window.
-
Click Add Component at the bottom of the Inspector window, and create a script named "ObjectPlacement" from the New script menu.
-
Move the created script to the Scripts folder in the Project window.
-
Select Edit Script in the Inspector window, and open
ObjectPlacement.csadded to AR Session Origin.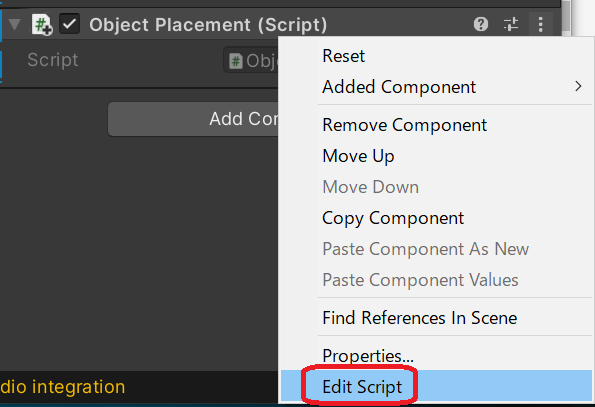
-
Implement the script as below, and save it.
using System.Collections.Generic;
using UnityEngine;
using UnityEngine.XR.ARFoundation;

public class ObjectPlacement : MonoBehaviour
{
    public Camera MainCamera;
    public GameObject SpawnObjectPrefab;
    public ARRaycastManager arRaycastManager;

    public void Update()
    {
        Touch touch;
        if (Input.touchCount > 0 && (touch = Input.GetTouch(0)).phase == TouchPhase.Began)
        {
            List<ARRaycastHit> hitResults = new List<ARRaycastHit>();

            if (arRaycastManager.Raycast(touch.position, hitResults, UnityEngine.XR.ARSubsystems.TrackableType.PlaneWithinPolygon))
            {
                foreach (ARRaycastHit hit in hitResults)
                {
                    if (Vector3.Dot(MainCamera.transform.position - hit.pose.position, hit.pose.up) > 0)
                    {
                        // Instantiate a new game object on the hit plane
                        Vector3 position = hit.pose.position;
                        position.y += 0.15f;
                        var planeObject = Instantiate(SpawnObjectPrefab, position, hit.pose.rotation);
                    }
                }
            }
        }
    }
}
Make settings for the ObjectPlacement Component created above. Set the size of Cube to display, and add Rigidbody functions for collision detection for the Cube. Then add AR Camera and AR Raycast Manager to identify the position on the AR plane touched on the screen.
-
Select GameObject / 3D Object / Cube from the top menu of Unity Editor, and add it onto the scene in the Hierarchy window.
-
Select Cube in the Hierarchy window, and set its Transform attributes in the Inspector window according to the figure below:

-
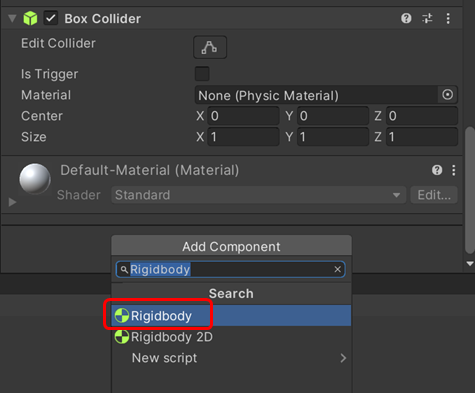
Select Add Component at the bottom of the Inspector window. The Search window is displayed.
-
Search for Rigidbody, select it, and add it.
-
Deploy Cube from the Hierarchy window to the Prefab folder to convert it to a Prefab.
-
Delete the original Cube from the Hierarchy window.
-
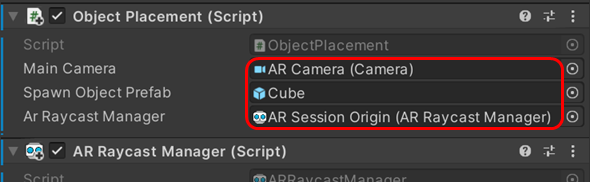
Set the Properties of ObjectPlacement added to AR Session Origin in the Inspector window as follows:
-
Main Camera: Set the AR Camera from the Hierarchy window.
-
Spawn Object Prefab: Set the Cube moved to Prefab folder.
-
Ar Raycast Manager: Set the AR Session Origin from the Hierarchy window.
-
Set the skeleton hand to be displayed
Make settings for recognizing hands in the displayed image, and display Skelton hands for them.
-
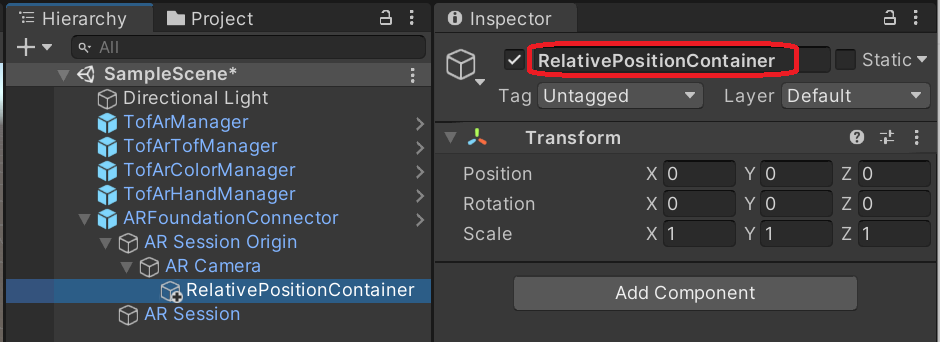
Select AR Camera in the Hierarchy window, and then select GameObject / Create Empty Child from top menu of Unity Editor. Add the GameObject to AR Camera in the Hierarchy window.
-
Select the new GameObject added to AR Camera, and change its name to "RelativePositionContainer".
-
Deploy
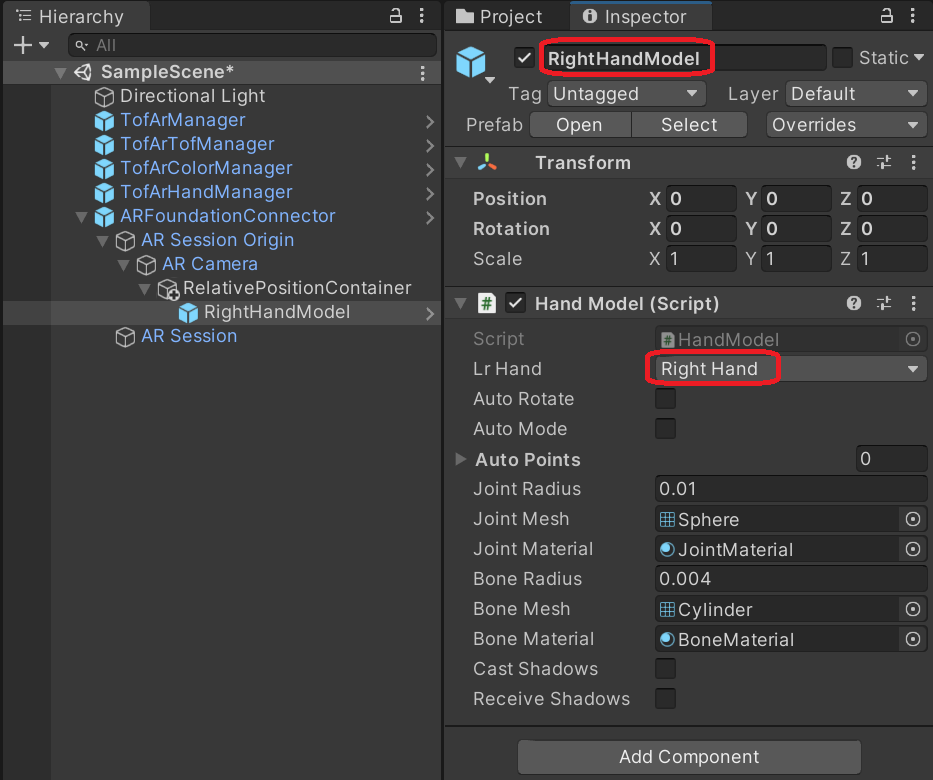
TofAr/TofArHand/V0/Resources/Prefabs/HandModelfrom the Project window onto RelativePositionContainer in the Hierarchy window.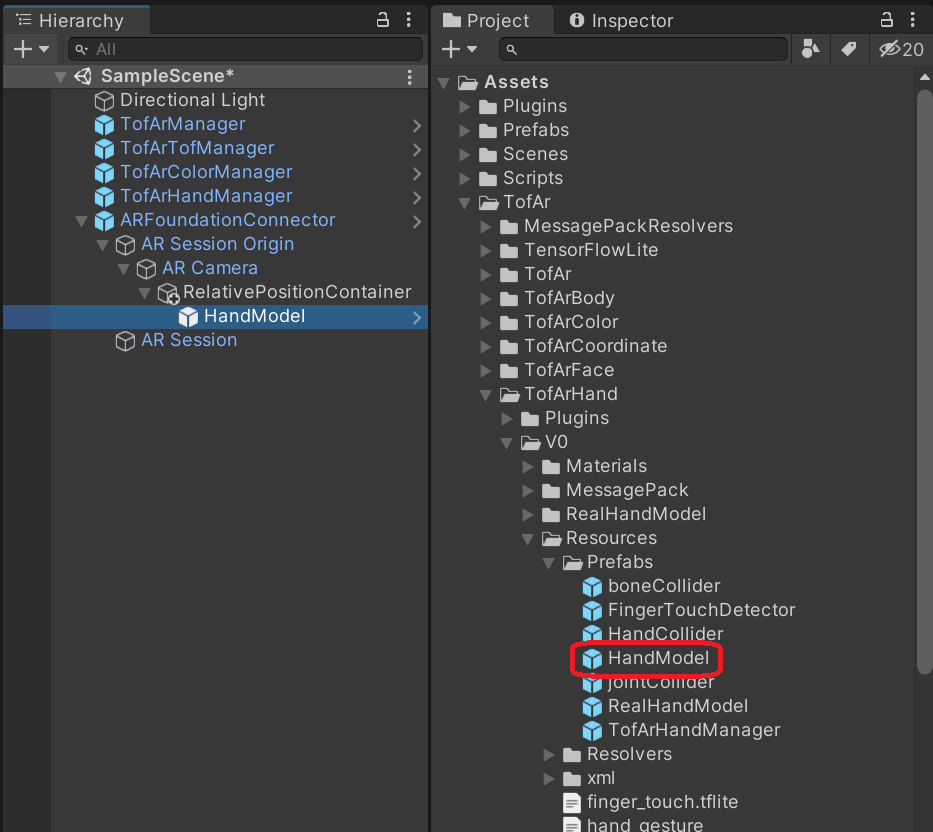
-
Select the HandModel deployed onto RelativePositionContainer, and change its name to "RightHandModel" in the Inspector window. Change the Lr Hand setting of HandModel to "Right Hand".
-
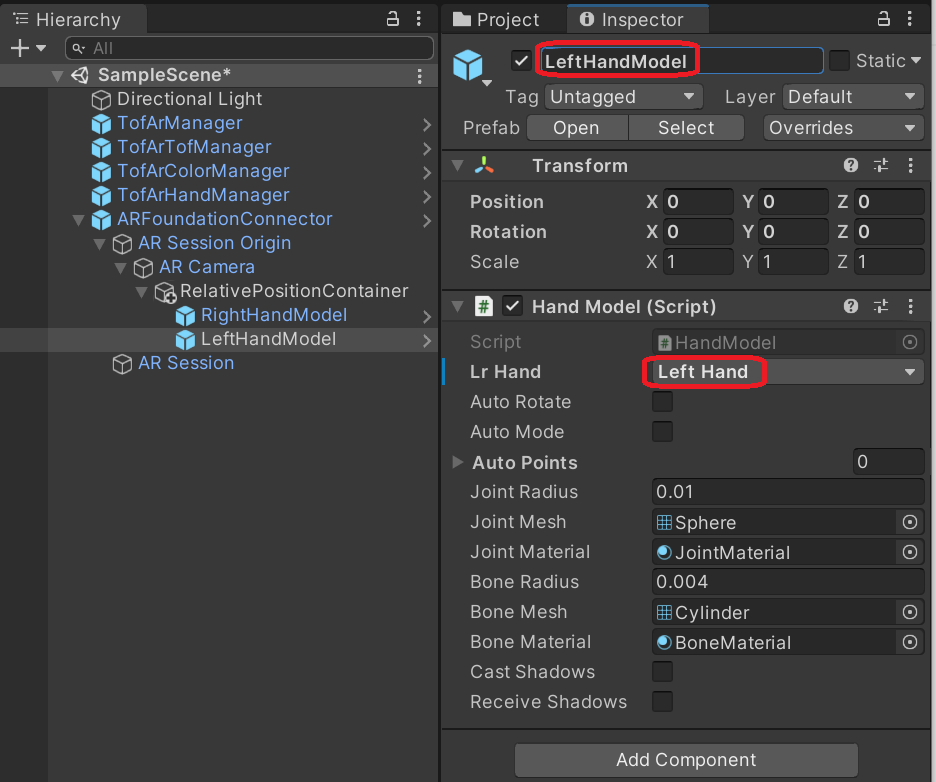
Deploy a second
TofAr/TofArHand/V0/Resources/Prefabs/HandModelfrom the Project window onto RelativePositionContainer in the Hierarchy window. -
Select the HandModel deployed onto RelativePositionContainer, and change its name to "LeftHandModel" in the Inspector window. Change the Lr Hand setting of HandModel to "Left Hand".
-
Deploy
TofAr/TofArHand/V0/Resources/Prefabs/HandColliderfrom the Project window onto RelativePositionContainer in the Hierarchy window.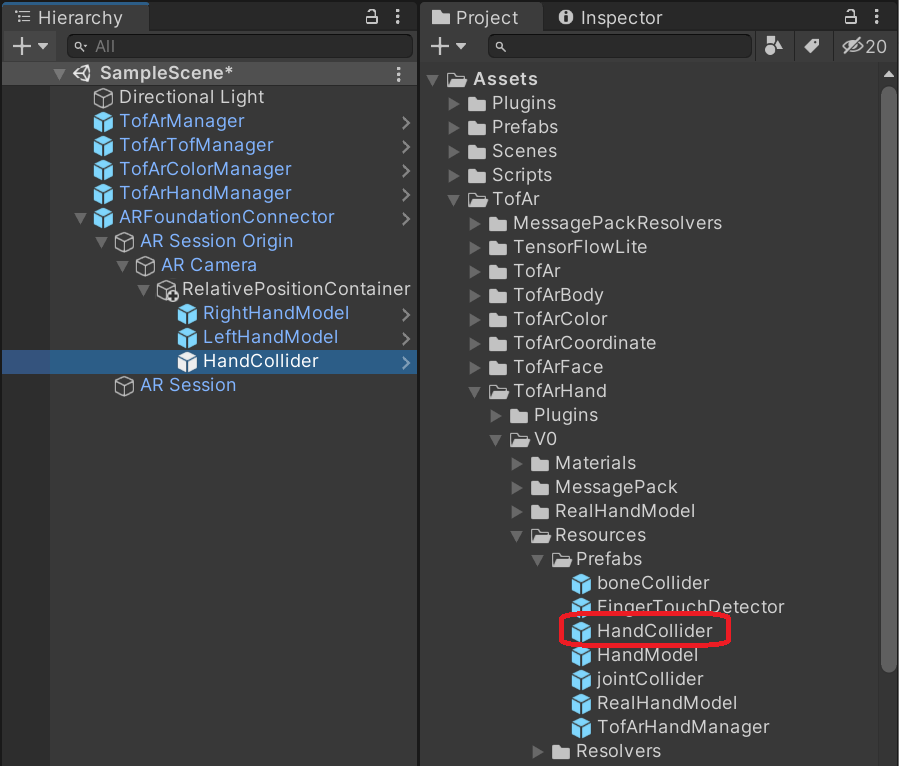
-
Select the HandCollider deployed onto RelativePositionContainer, and change its name to "RightHandCollider" in the Inspector window.
Change the Lr Hand setting of HandCollider to "Right Hand".
Check that all parameters of Position under Transform are set to 0.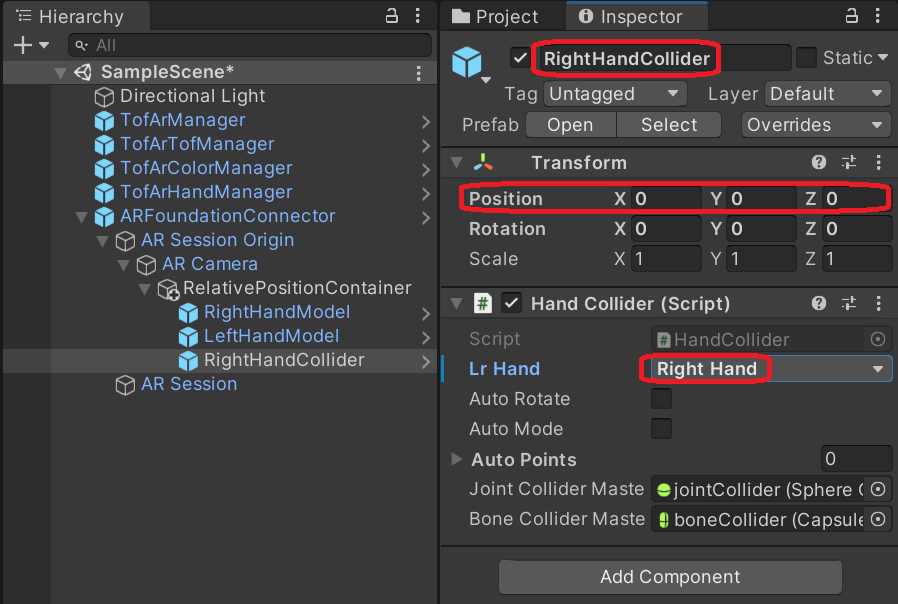
-
Deploy a second
TofAr/TofArHand/V0/Resources/Prefabs/HandColliderfrom the Project window onto RelativePositionContainer in the Hierarchy window. -
Select the new HandCollider deployed onto RelativePositionContainer, and change its name to "LeftHandCollider" in the Inspector window.
Change the Lr Hand setting of HandCollider to "Left Hand".
Check that all parameters of Position under Transform are set to 0.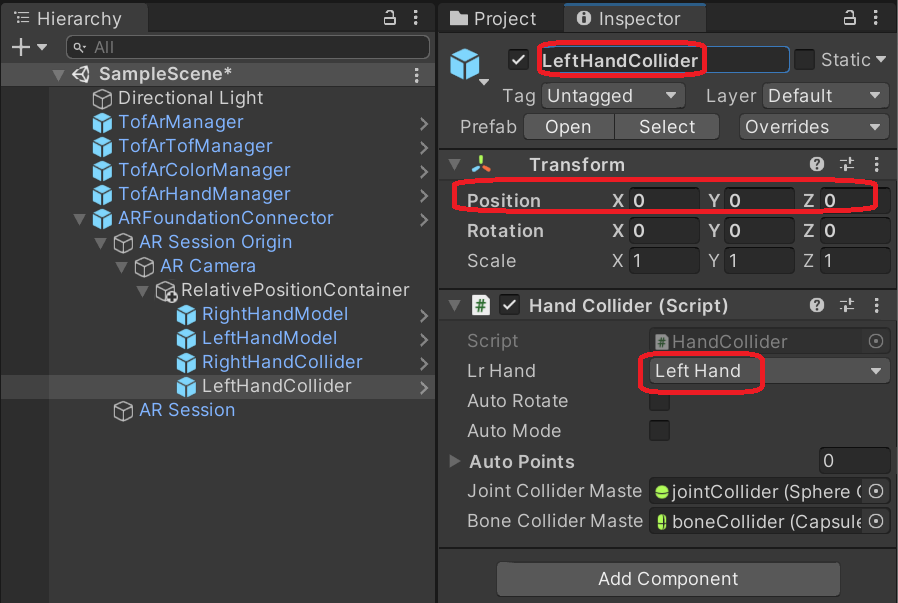
-
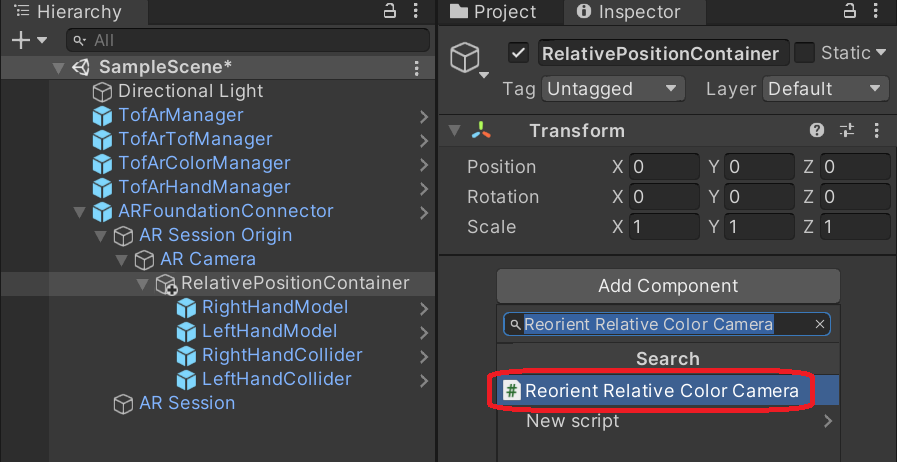
Add the "Reorient Relative Color Camera" Component to RelativePositionContainer, to align orientations of the screen and the Skeleton hand displayed.
-
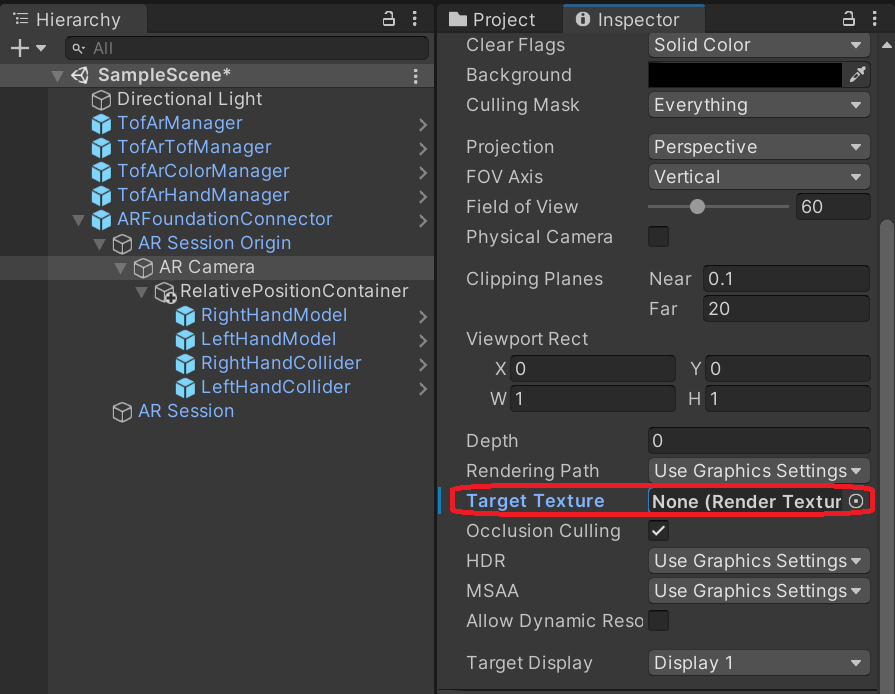
Select AR Camera in the Hierarchy window, and Set Target Texture to "None" in the Inspector window.
5.2.3. Executing the application
Build the application into a format that can
be executed on the target device.
Install the executable file on the device
and execute it.
Preparation
Connect the development PC to the target device via USB.
Procedure
Build and execute the application on the device
-
Click Build And Run.
The application will be built and installed on the device. For Android applications, it will be installed directly on the device. After the installation is completed, the application will be executed on the device.
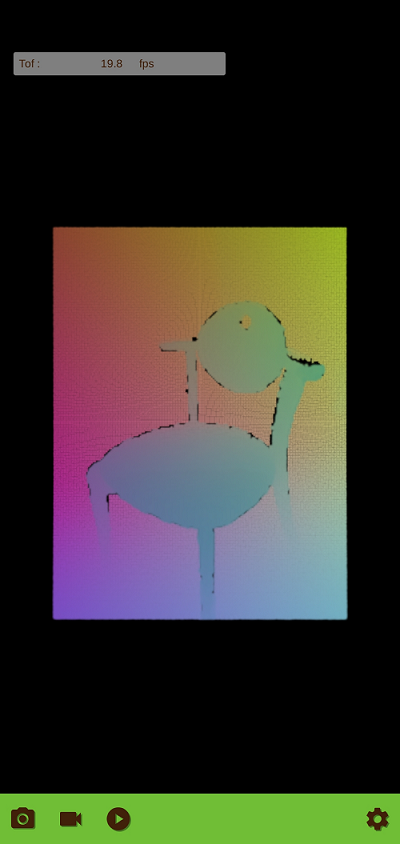
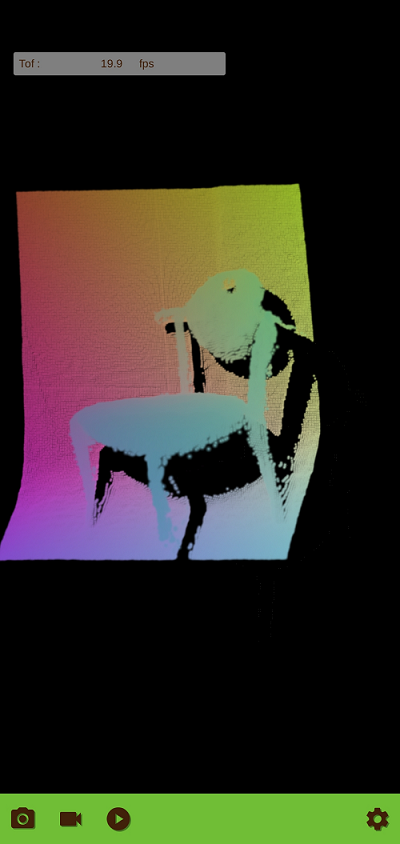
5.3. Application to display PointCloud data by Particle System
This tutorial describes creating an application for displaying PointCloud data acquired by ToF AR, by Particle System in Unity. While creating this application, the method using ToF AR data and Toolbar provided in TofAR_Samples_Basic is described.
This tutorial assumes that the application will run on a supported iOS device with the following functions:
-
Display PointCloud data by Particle System.
-
Display particles as a colored image, with colors based on the positions of each PointCloud data.
-
Display settings can be configured by GUI.
5.3.1. Build settings
Configure the environment for the application build.
Preparation
Make sure that TofAR_Base_xxxx_iOS.unitypackage is set up in this Unity project. To set it up, see Set up ToF AR. This tutorial uses the Base component package only.
Make sure that the TofAR_Samples_Basic Project, which includes ToF AR sample programs, is set up in this unity project. Set this up as follows:
-
Copy the
TofArSamplesBasicdirectory and theTofArSettingsdirectory from theAssetsdirectory of the TofAR_Samples_Basic Project to theAssetsdirectory of this project. -
Delete the
Handdirectory and theMarkRecogdirectory from theTofArSamplesBasicdirectory. -
Delete the
Scripts/Handdirectory and theScripts/MarkRecogdirectory in theTofArSettingsdirectory.
Procedure
Select a device to execute the application
-
Select File / Build Settings… to open the Build Settings window.
-
Select the platform (OS) of the target device to run the application. For this tutorial, select iOS, and then select Switch Platform.
Configure the build settings
-
From the Unity Menu, select File / Build Settings… / Player Settings / iOS Settings.
-
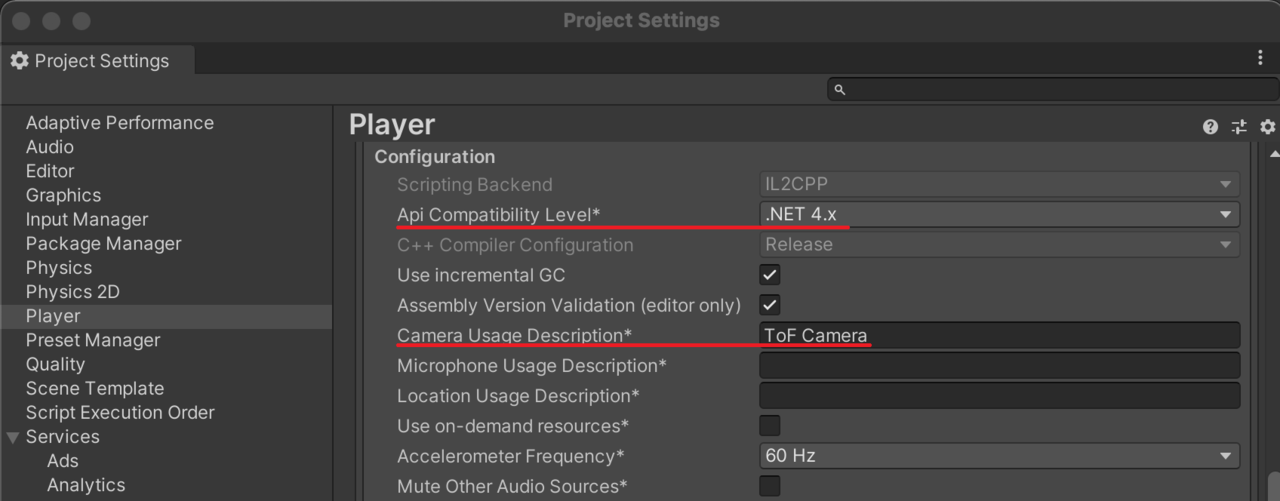
Set Other Settings / Configuration / Api Compatibility Level to ".NET 4.x".
-
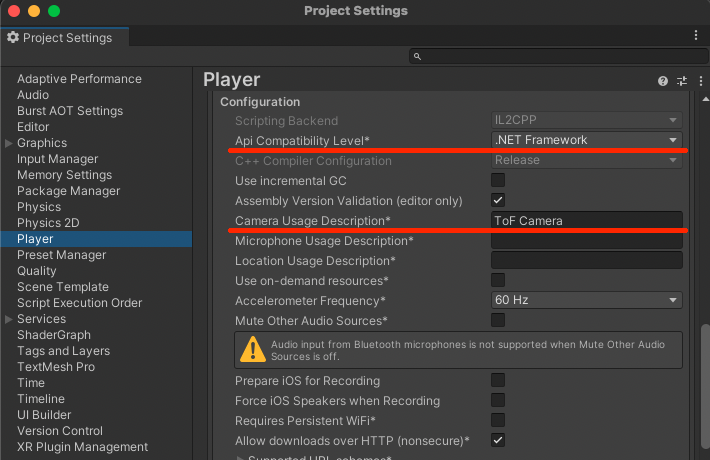
Set Other Settings / Configuration / Camera Usage Description to "ToF Camera" or any character string describing the ToF camera.
5.3.2. Creating the application
Create an application that displays PointCloud data, using Particle System in Unity and ToF AR.
Preparation
Make sure that ToF AR packages are set up in this Unity project.
Procedure
Create a funtion to display PointCloud data
Create the function to display the PointCloud data acquired by a ToF camera by applying Particle System.
TofArManager is a class that provides commonly used functions in ToF AR and is defined as a Prefab. TofArManager includes functions to acquire PointCloud data from the ToF camera. TofArManager is always required for applications that use ToF AR.
-
Deploy
TofAr/TofAr/TofArManagerfrom the Project window onto the scene in the Hierarchy window.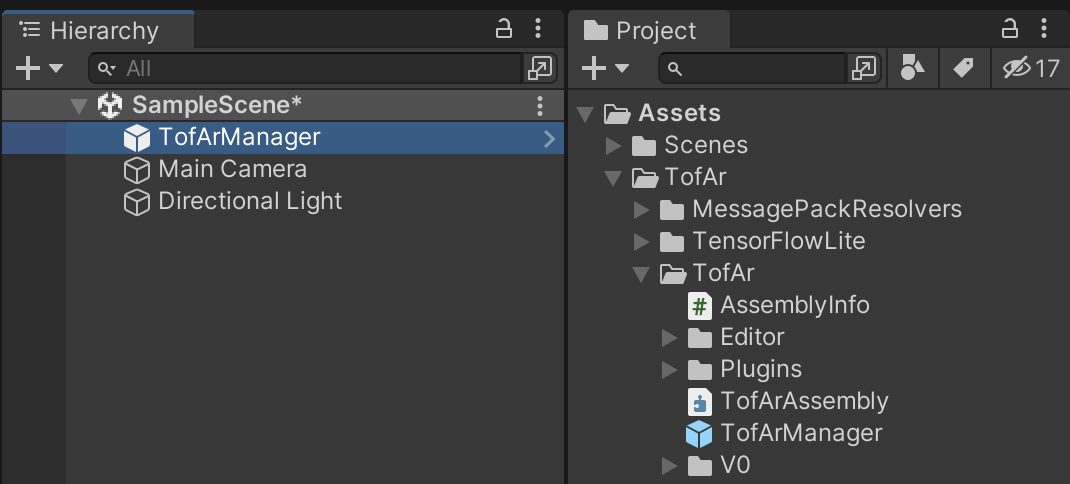
TofArTofManager is a class that manages the connection with device and is defined as a Prefab. It acquires data, such as Depth data and Confidence data, from the ToF camera. In this application, TofArTofManager is used to acquire PointCloud data.
-
Deploy
TofAr/TofArTof/TofArTofManagerfrom the Project window onto the scene in the Hierarchy window.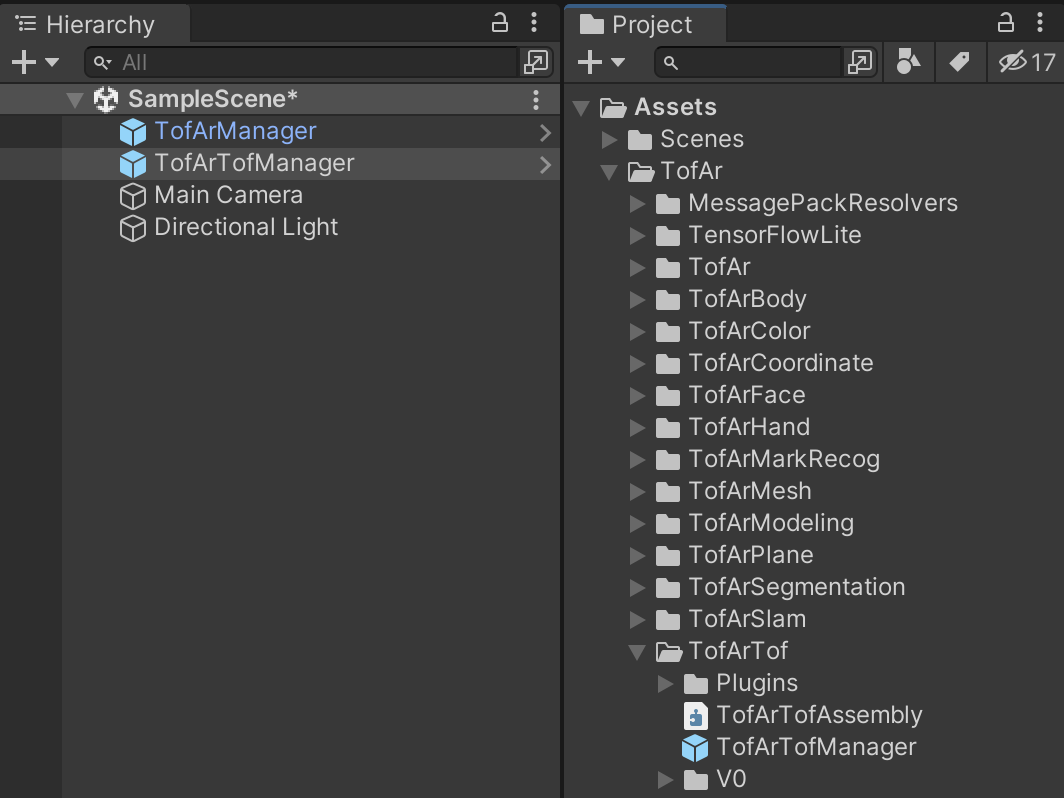
-
Select TofArTofManager in the Hierarchy window.
-
Deselect Auto Start in the Inspector window so that processing will not start automatically when this application is started.
Set the FPS value and Delay value of ToF data to be acquired from the ToF camera, and make settings for the recording and playback functions. This uses TofController as a Prefab in TofArSettings to control ToF data via TofArTofManager.
-
Select GameObject / Create Empty from the top menu of Unity Editor, and deploy a new GameObject onto the scene in the Hierarchy window.
-
Select the deployed GameObject, and rename it "Controllers" in the Inspector window.
-
Deploy
TofArSettings/Prefabs/Controllers/TofControllerfrom the Project window ontoControllersin the Hierarchy window.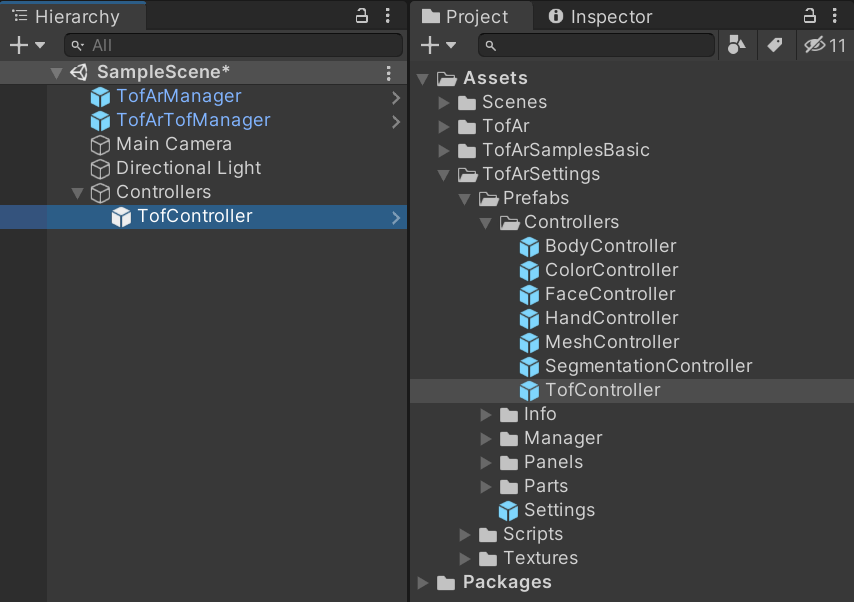
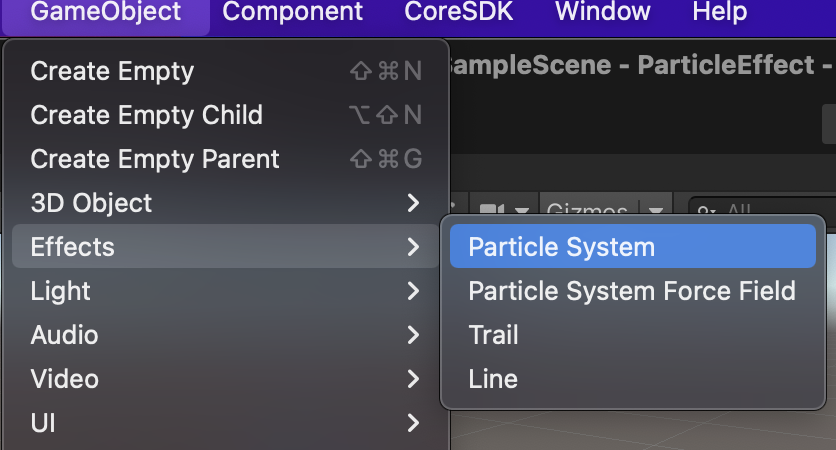
Deploy the Particle System in Unity and set the display settings for PointCloud data.
-
Select GameObject / Effect / Particle System from the top menu of Unity Editor, and deploy it onto the scene in the Hierarchy window.
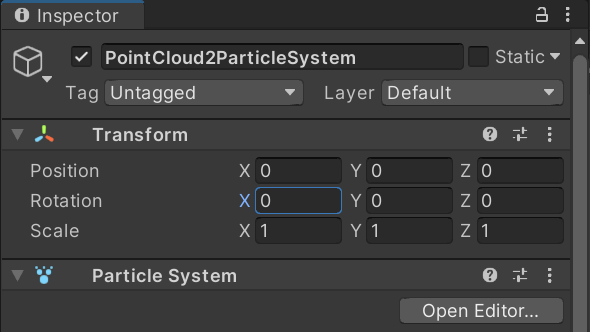
-
Select the deployed Particle System, and rename it to "PointCloud2ParticleSystem" in the Inspector window.
-
Set the Transform component properties like the image below:
-
Set the Particle System main module of PointCloud2ParticleSystem in the Inspector window like the image below:
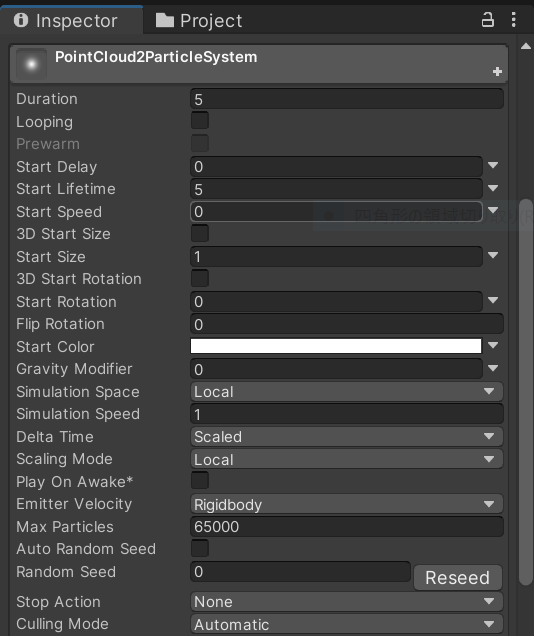
-
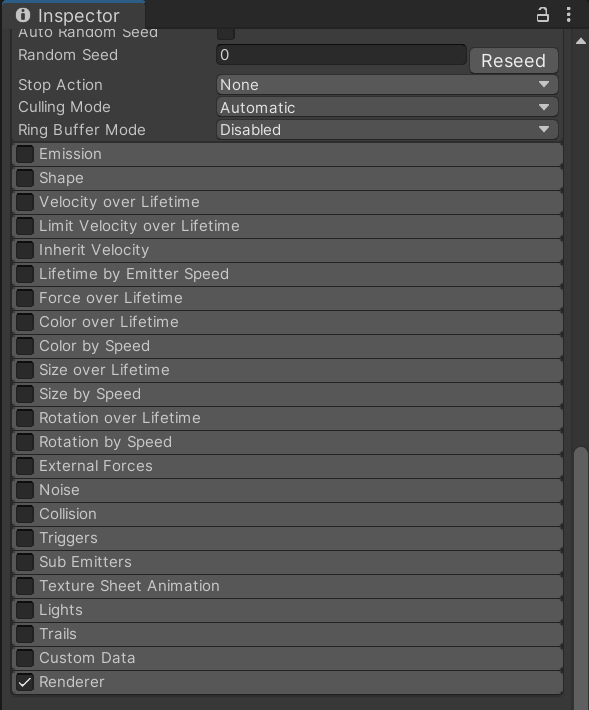
Turn off everything except the Particle System Renderer module of PointCloud2ParticleSystem in the Inspector window.
-
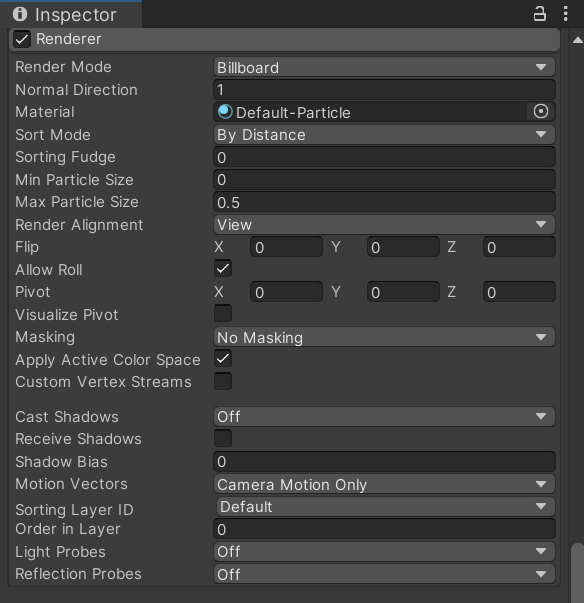
Set the Particle System Renderer module of PointCloud2ParticleSystem in the Inspector window as in the image below:
At this stage, we can display PointCloud data three-dimensionally.
-
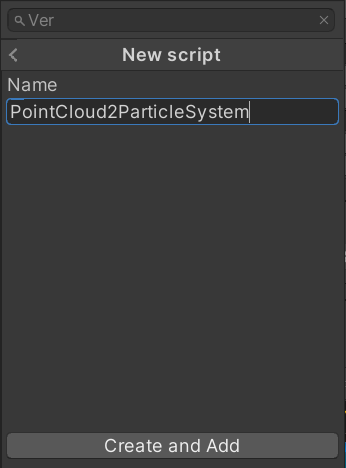
Select Add Component at the bottom of the Inspector window, and then create and add a new script named "PointCloud2ParticleSystem" from the New script menu.
-
In the Inspector window, select Edit Script, and open the new
PointCloud2ParticleSystem.csfile added to the PointCloud2ParticleSystem object.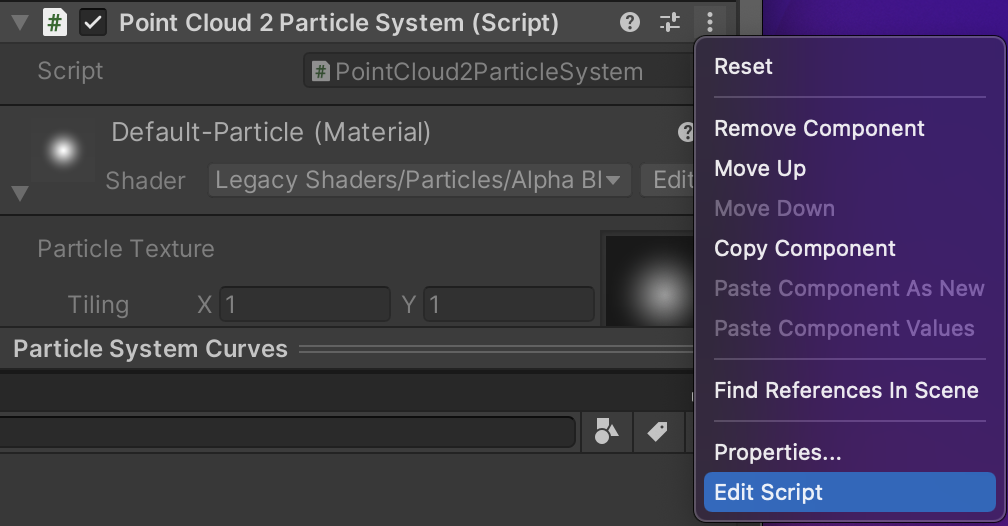
-
Implement a script to create Particles based on PointCloud data and set them in Particle System.
The details of the script are described below. Refer to PointCloud2ParticleSystem.cs for the full script.
-
Define the variables necessary for processing.
private ParticleSystem particleSystem;
private ParticleSystem.Particle[] particles;
private object sync = new object();
private bool updated = false;
private Vector3[] vs;
These variables are used as:
-
particleSystem- components of ParticleSystem -
particles- array of Particle data to set PointCloud data -
sync- object for exclusive processing -
updated- flag to indicate update -
vs- array of acquired PointCloud data
-
-
OnEnable()is called when the object becomes active, and sets the callback for receiving frame data.void OnEnable() { TofArTofManager.OnFrameArrived += OnTofFrameArrived; } -
OnDisable()is called when the object becomes invalid, and cancels the callback for receiving frame data.private void OnDisable() { TofArTofManager.OnFrameArrived -= OnTofFrameArrived; } -
Start()is called at the start of the script, and gets the ParticleSystem component.void Start() { particleSystem = GetComponent<ParticleSystem>(); } -
OnTofFrameArrivedis called every time ToF data is received. It gets PointCloud data from TofArTofManager and sets it in thevsarray. It also sets theupdatedflag to true after setting ToF data.private void OnTofFrameArrived(object stream) { if (!TofArTofManager.Instantiated) { return; } var pointCloudData = TofArTofManager.Instance.PointCloudData; if (pointCloudData == null || pointCloudData.Points == null) { return; } lock (sync) { vs = pointCloudData.Points; } updated = true; } -
Update()is called for every frame of Unity, and it generates the array ofParticleifupdatedflag is true. It generates RGB color data using PointCloud data stored invsand sets this inParticle. It also sets the generatedParticlein Particle System.void Update() { if (updated) { updated = false; lock (sync) { particles = new ParticleSystem.Particle[vs.Length]; particleSystem.GetParticles(particles); for (int i = 0; i < vs.Length; i++) { particles[i].position = vs[i]; float r = Mathf.Min(1, Mathf.Max(0, (vs[i].z) / 2)); float g = Mathf.Min(1, Mathf.Max(0, (vs[i].y + 1f) / 2)); float b = Mathf.Min(1, Mathf.Max(0, (vs[i].x + 1f) / 2)); particles[i].startColor = new Color(r, g, b); particles[i].startSize = 0.02f; } particleSystem.SetParticles(particles); } } }
-
-
Save the script.
-
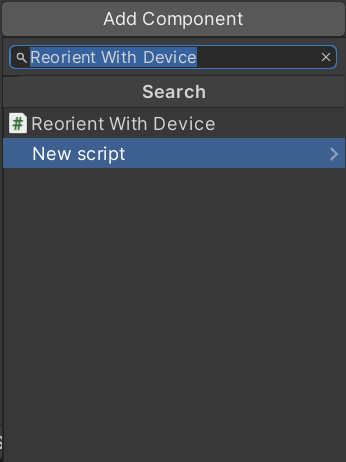
Select Add Component at the bottom of the Inspector window. The Search window is displayed.
-
Search for Reorient With Device, select it, and add it.
Generating function setting GUI
Display a toolbar at the edge of the screen, and deploy buttons so that the user can make settings for the ToF camera, recording, playback functions, and so on.

We place GUI parts which provide functions like Toolbar and make the necessary settings. The Settings Prefab provided in TofArSettings includes GUI parts such as the Toolbar Prefab. Instantiate this Settings Prefab and make setttings so that various functions can be used, including ToF camera settings, Record Settings, Rec Player Settings, and General Settings. The Toolbar Prefab has buttons to activate various functions by default. Deactivate the functions not needed for this tutorial.
-
Deploy
TofArSettings/Prefabs/Settingsfrom the Project window onto the scene in the Hierarchy window.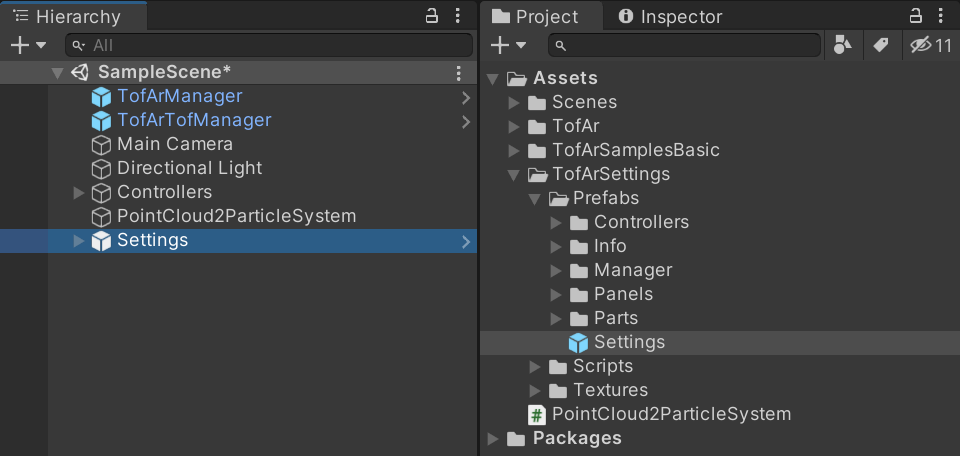
-
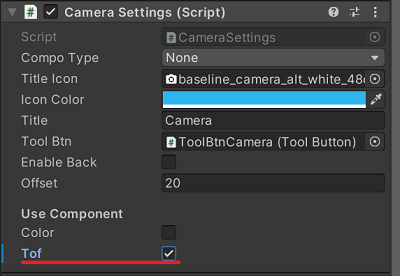
Select Settings / Canvas / SafeArea / Panels / CameraSettings in the Hierarchy window and then, in the Inspector window, under Camera Settings and then Use Component, select Tof.
-
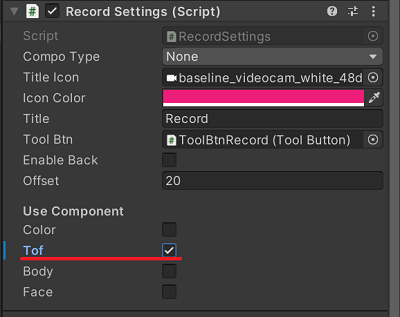
Select Settings / Canvas / SafeArea / Panels / RecordSettings in the Hierarchy window and then, in the Inspector window, under Record Settings and then Use Component, select Tof.
-
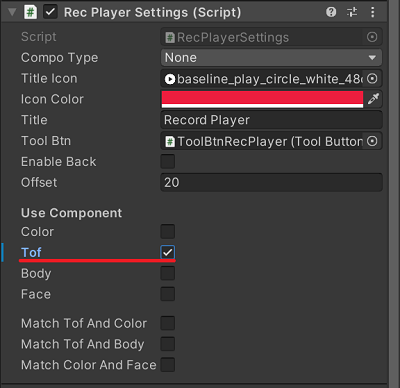
Select Settings / Canvas / SafeArea / Panels / RecPlayerSettings in the Hierarchy window and then, in the Inspector window, under Rec Player Settings and then Use Component, select Tof.
-
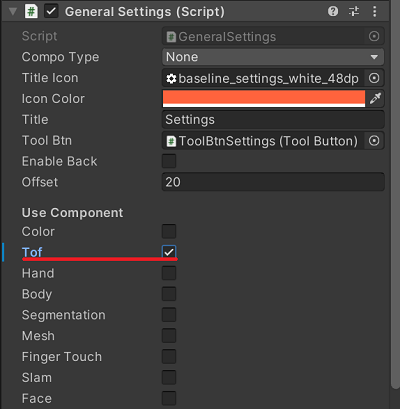
Select Settings / Canvas / SafeArea / Panels / GeneralSettings in the Hierarchy window and then, in the Inspector window, under General Settings and then Use Component, select Tof.
-
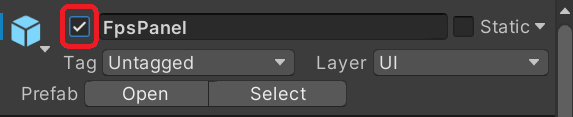
Select Settings / Canvas / SafeArea / DebugInfo / FpsPanel in the Hierarchy window, and then select it to activate the FpsPanel object in the Inspector window, as shown below:
-
Select Settings / Canvas / SafeArea / DebugInfo / FpsPanel / TxFpsTof in the Hierarchy window, and then select it to activate the TxFpsTof object in the Inspector window, as shown below:

-
If any other objects in FpsPanel are active, then deselect them to deactivate those objects.
ToF camera Settings
Make settings to change the orientation of the displayed image according to the orientation of the screen or the user’s operation. This will mean that the viewpoint of the displayed image can be changed by changing the orientation of the ToF camera screen, or by touching the screen and sliding your finger.
-
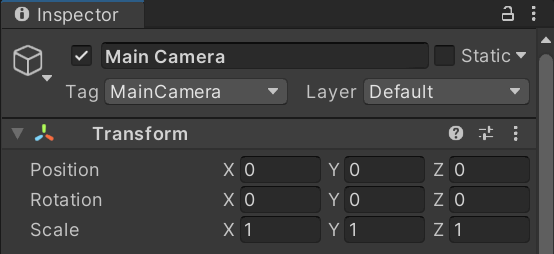
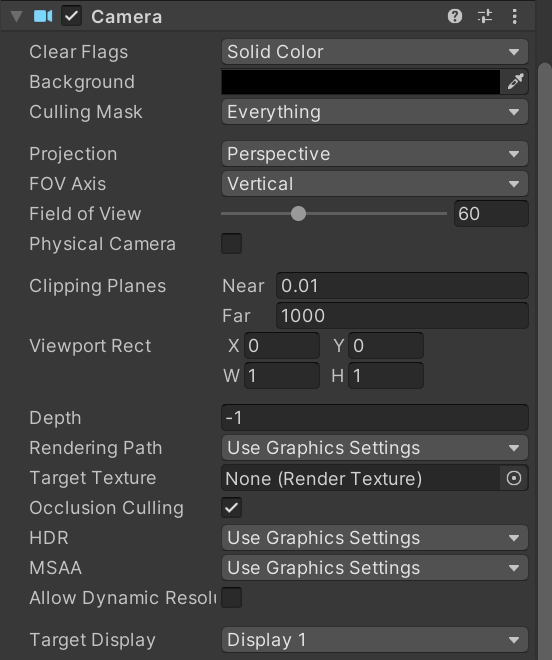
Select Main Camera in the Hierarchy window and set the Transform component in the Inspector window as follows:
-
Also in the same Inspector window, set the Camera component as follows:
-
Select Add Component at the bottom of the Inspector window. The Search window is displayed.
-
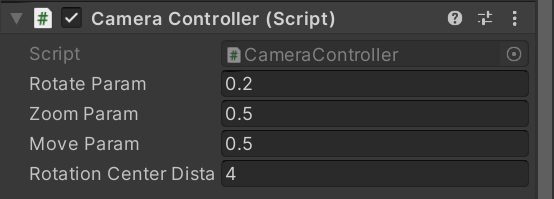
Search for Camera Controller, select it, and add it.
-
Select the Camera Controller Component in the Inspector window to activate it.
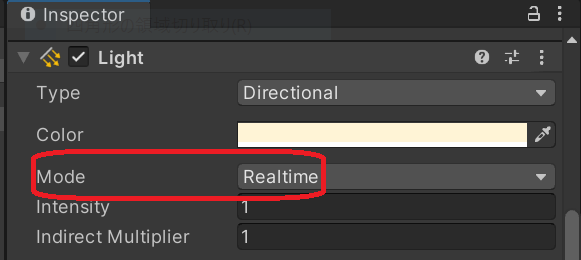
Light Settings
-
Select Directional Light in the Hierarchy window, and then, in the Inspector window, set Mode to "Realtime" for the Light component.
5.3.3. Executing the application
Build the application into a format that can
be executed on the target device.
Install the executable file on the device
and execute it.
Preparation
Connect the development PC to the target device via USB.
Procedure
-
Click Build And Run to build the application. For iOS, an Xcode project will be output.
-
Make settings, such as Application signature, in Xcode, and then click Build And Run to build and install it on the device. After installation is completed, the application will be executed on the device.
An outline of the functions is described below:
-
Select the Camera button at the bottom left of the screen to select the ToF camera to use and to set its Depth data size.

-
Select the Record button to record the displayed image.

-
Select the Play button to play back the recorded image.

-
Select the Settings button to open the panel for general setting functions.

-
Touch and swipe on the screen to rotate the displayed particle data three-dimensionally.
-
6. List of devices supported by ToF AR
This is a list of devices supported by the ToF AR SDK. This list also includes the camera IDs and default settings for supported devices.
6.1. List of SDK compatible devices
| ModelGroup | Model | Json file |
|---|---|---|
Sony Xperia 1 II |
SOG01 |
sony_xperia1-2_v1.4.0.json |
Sony Xperia 1 II |
SO-51A |
sony_xperia1-2_v1.4.0.json |
Sony Xperia 1 II |
XQ-AT42 |
sony_xperia1-2_v1.4.0.json |
Sony Xperia 1 II |
XQ-AT51 |
sony_xperia1-2_v1.4.0.json |
Sony Xperia 1 II |
XQ-AT52 |
sony_xperia1-2_v1.4.0.json |
Sony Xperia 1 II |
XQ-AT72 |
sony_xperia1-2_v1.4.0.json |
Sony Xperia 1 III |
A101SO |
sony_xperia1-3_v1.4.0.json |
Sony Xperia 1 III |
SO-51B |
sony_xperia1-3_v1.4.0.json |
Sony Xperia 1 III |
SOG03 |
sony_xperia1-3_v1.4.0.json |
Sony Xperia 1 III |
XQ-BC42 |
sony_xperia1-3_v1.4.0.json |
Sony Xperia 1 III |
XQ-BC52 |
sony_xperia1-3_v1.4.0.json |
Sony Xperia 1 III |
XQ-BC62 |
sony_xperia1-3_v1.4.0.json |
Sony Xperia 1 III |
XQ-BC72 |
sony_xperia1-3_v1.4.0.json |
Sony Xperia 1 IV |
A201SO |
sony_xperia1-4_v1.4.0.json |
Sony Xperia 1 IV |
SO-51C |
sony_xperia1-4_v1.4.0.json |
Sony Xperia 1 IV |
SOG06 |
sony_xperia1-4_v1.4.0.json |
Sony Xperia 1 IV |
XQ-CT44 |
sony_xperia1-4_v1.4.0.json |
Sony Xperia 1 IV |
XQ-CT54 |
sony_xperia1-4_v1.4.0.json |
Sony Xperia 1 IV |
XQ-CT62 |
sony_xperia1-4_v1.4.0.json |
Sony Xperia 1 IV |
XQ-CT72 |
sony_xperia1-4_v1.4.0.json |
Sony Xperia PRO |
XQ-AQ52 |
sony_xperiaPRO_v1.4.0.json |
Sony Xperia PRO |
XQ-AQ62 |
sony_xperiaPRO_v1.4.0.json |
Sony Xperia PRO I |
XQ-BE42 |
sony_xperiaPRO-I_v1.4.0.json |
Samsung Galaxy Note10+ |
SC-01M |
samsung_galaxy_note_10+_v1.4.0.json |
Samsung Galaxy Note10+ |
SCV45 |
samsung_galaxy_note_10+_v1.4.0.json |
Samsung Galaxy Note10+ |
SM-N9750 |
samsung_galaxy_note_10+_v1.4.0.json |
Samsung Galaxy Note10+ |
SM-N9750/DS |
samsung_galaxy_note_10+_v1.4.0.json |
Samsung Galaxy Note10+ |
SM-N975C |
samsung_galaxy_note_10+_v1.4.0.json |
Samsung Galaxy Note10+ |
SM-N975N |
samsung_galaxy_note_10+_v1.4.0.json |
Samsung Galaxy Note10+ |
SM-N975U |
samsung_galaxy_note_10+_v1.4.0.json |
Samsung Galaxy Note10+ |
SM-N975U1 |
samsung_galaxy_note_10+_v1.4.0.json |
Samsung Galaxy Note10+ |
SM-N975W |
samsung_galaxy_note_10+_v1.4.0.json |
Samsung Galaxy Note10+ |
SM-N975F |
samsung_galaxy_note_10+_v1.4.0.json |
Samsung Galaxy Note10+ |
SM-N975F/DS |
samsung_galaxy_note_10+_v1.4.0.json |
Samsung Galaxy Note10+ |
SM-N976B |
samsung_galaxy_note_10+_v1.4.0.json |
Samsung Galaxy Note10+ |
SM-N976N |
samsung_galaxy_note_10+_v1.4.0.json |
Samsung Galaxy Note10+ |
SM-N9760 |
samsung_galaxy_note_10+_v1.4.0.json |
Samsung Galaxy Note10+ |
SM-N976Q |
samsung_galaxy_note_10+_v1.4.0.json |
Samsung Galaxy Note10+ |
SM-N976V |
samsung_galaxy_note_10+_v1.4.0.json |
Samsung Galaxy Note10+ |
SM-N976U |
samsung_galaxy_note_10+_v1.4.0.json |
Samsung Galaxy S10 5G |
SC-03L |
samsung_galaxy_s10_v1.4.0.json |
Samsung Galaxy S10 5G |
SCV41 |
samsung_galaxy_s10_v1.4.0.json |
Samsung Galaxy S10 5G |
SM-G973F |
samsung_galaxy_s10_v1.4.0.json |
Samsung Galaxy S10 5G |
SM-G973N |
samsung_galaxy_s10_v1.4.0.json |
Samsung Galaxy S10 5G |
SM-G9730 |
samsung_galaxy_s10_v1.4.0.json |
Samsung Galaxy S10 5G |
SM-G9738 |
samsung_galaxy_s10_v1.4.0.json |
Samsung Galaxy S10 5G |
SM-G973C |
samsung_galaxy_s10_v1.4.0.json |
Samsung Galaxy S10 5G |
SM-G973U |
samsung_galaxy_s10_v1.4.0.json |
Samsung Galaxy S10 5G |
SM-G973U1 |
samsung_galaxy_s10_v1.4.0.json |
Samsung Galaxy S10 5G |
SM-G973W |
samsung_galaxy_s10_v1.4.0.json |
Samsung Galaxy S10 5G |
SM-G977B |
samsung_galaxy_s10_v1.4.0.json |
Samsung Galaxy S10 5G |
SM-G977N |
samsung_galaxy_s10_v1.4.0.json |
Samsung Galaxy S10 5G |
SM-G977P |
samsung_galaxy_s10_v1.4.0.json |
Samsung Galaxy S10 5G |
SM-G977T |
samsung_galaxy_s10_v1.4.0.json |
Samsung Galaxy S10 5G |
SM-G977U |
samsung_galaxy_s10_v1.4.0.json |
Samsung Galaxy S10 5G |
SM-G770F |
samsung_galaxy_s10_v1.4.0.json |
Samsung Galaxy S10 5G |
SM-G770U1 |
samsung_galaxy_s10_v1.4.0.json |
Samsung Galaxy S10 5G |
SC-04L |
samsung_galaxy_s10_v1.4.0.json |
Samsung Galaxy S10 5G |
SCV42 |
samsung_galaxy_s10_v1.4.0.json |
Samsung Galaxy S10 5G |
SM-G975F |
samsung_galaxy_s10_v1.4.0.json |
Samsung Galaxy S10 5G |
SM-G975N |
samsung_galaxy_s10_v1.4.0.json |
Samsung Galaxy S10 5G |
SM-G9750 |
samsung_galaxy_s10_v1.4.0.json |
Samsung Galaxy S10 5G |
SM-G9758 |
samsung_galaxy_s10_v1.4.0.json |
Samsung Galaxy S10 5G |
SM-G975U |
samsung_galaxy_s10_v1.4.0.json |
Samsung Galaxy S10 5G |
SM-G975U1 |
samsung_galaxy_s10_v1.4.0.json |
Samsung Galaxy S10 5G |
SM-G975W |
samsung_galaxy_s10_v1.4.0.json |
Samsung Galaxy S10 5G |
SC-05L |
samsung_galaxy_s10_v1.4.0.json |
Samsung Galaxy S10 5G |
SM-G970F |
samsung_galaxy_s10_v1.4.0.json |
Samsung Galaxy S10 5G |
SM-G970N |
samsung_galaxy_s10_v1.4.0.json |
Samsung Galaxy S10 5G |
SM-G9700 |
samsung_galaxy_s10_v1.4.0.json |
Samsung Galaxy S10 5G |
SM-G9708 |
samsung_galaxy_s10_v1.4.0.json |
Samsung Galaxy S10 5G |
SM-G970U |
samsung_galaxy_s10_v1.4.0.json |
Samsung Galaxy S10 5G |
SM-G970U1 |
samsung_galaxy_s10_v1.4.0.json |
Samsung Galaxy S10 5G |
SM-G970W |
samsung_galaxy_s10_v1.4.0.json |
Samsung Galaxy S10 5G |
SM-G9770 |
samsung_galaxy_s10_v1.4.0.json |
Samsung Galaxy S20 Ultra |
SCG03 |
samsung_galaxy_s20_ultra_v1.4.0.json |
Samsung Galaxy S20 Ultra |
SM-G9880 |
samsung_galaxy_s20_ultra_v1.4.0.json |
Samsung Galaxy S20 Ultra |
SM-G988N |
samsung_galaxy_s20_ultra_v1.4.0.json |
Samsung Galaxy S20 Ultra |
SM-G988Q |
samsung_galaxy_s20_ultra_v1.4.0.json |
Samsung Galaxy S20 Ultra |
SM-G988U |
samsung_galaxy_s20_ultra_v1.4.0.json |
Samsung Galaxy S20 Ultra |
SM-G988U1 |
samsung_galaxy_s20_ultra_v1.4.0.json |
Samsung Galaxy S20 Ultra |
SM-G988W |
samsung_galaxy_s20_ultra_v1.4.0.json |
Samsung Galaxy S20 Ultra |
SM-G988B |
samsung_galaxy_s20_ultra_v1.4.0.json |
Samsung Galaxy S20 Plus 4G |
SM-G985 |
samsung_galaxy_s20_plus_4G_v1.4.0.json |
Samsung Galaxy S20 Plus 4G |
SM-G985F |
samsung_galaxy_s20_plus_4G_v1.4.0.json |
Samsung Galaxy S20 Plus 4G |
SM-G985F/DS |
samsung_galaxy_s20_plus_4G_v1.4.0.json |
Samsung Galaxy S20 Plus 5G |
SC-52A |
samsung_galaxy_s20_plus_5G_v1.4.0.json |
Samsung Galaxy S20 Plus 5G |
SCG02 |
samsung_galaxy_s20_plus_5G_v1.4.0.json |
Samsung Galaxy S20 Plus 5G |
SM-G986 |
samsung_galaxy_s20_plus_5G_v1.4.0.json |
Samsung Galaxy S20 Plus 5G |
SM-G9860 |
samsung_galaxy_s20_plus_5G_v1.4.0.json |
Samsung Galaxy S20 Plus 5G |
SM-G986N |
samsung_galaxy_s20_plus_5G_v1.4.0.json |
Samsung Galaxy S20 Plus 5G |
SM-G986U |
samsung_galaxy_s20_plus_5G_v1.4.0.json |
Samsung Galaxy S20 Plus 5G |
SM-G986U1 |
samsung_galaxy_s20_plus_5G_v1.4.0.json |
Samsung Galaxy S20 Plus 5G |
SM-G986W |
samsung_galaxy_s20_plus_5G_v1.4.0.json |
Samsung Galaxy S20 Plus 5G |
SM-G986B/DS |
samsung_galaxy_s20_plus_5G_v1.4.0.json |
Huawei P30 Pro |
HW-02L |
huawei_p30_pro_v1.4.0.json |
Huawei P30 Pro |
VOG-AL00 |
huawei_p30_pro_v1.4.0.json |
Huawei P30 Pro |
VOG-AL10 |
huawei_p30_pro_v1.4.0.json |
Huawei P30 Pro |
VOG-L04 |
huawei_p30_pro_v1.4.0.json |
Huawei P30 Pro |
VOG-L09 |
huawei_p30_pro_v1.4.0.json |
Huawei P30 Pro |
VOG-L29 |
huawei_p30_pro_v1.4.0.json |
Huawei P30 Pro |
VOG-TL00 |
huawei_p30_pro_v1.4.0.json |
Huawei P40 Pro |
ELS-NX9 |
huawei_p40_pro_v1.4.0.json |
Huawei P40 Pro |
ELS-AN00 |
huawei_p40_pro_v1.4.0.json |
Huawei P40 Pro |
ELS-TN00 |
huawei_p40_pro_v1.4.0.json |
Huawei P40 Pro |
ELS-N04 |
huawei_p40_pro_v1.4.0.json |
Huawei P40 Pro |
ELS-N29 |
huawei_p40_pro_v1.4.0.json |
Huawei P40 Pro |
ELS-N29D |
huawei_p40_pro_v1.4.0.json |
Huawei P40 Pro+ |
ELS-AN10 |
huawei_p40_pro_plus_v1.4.0.json |
Huawei P40 Pro+ |
ELS-TN10 |
huawei_p40_pro_plus_v1.4.0.json |
Huawei P40 Pro+ |
ELS-N39 |
huawei_p40_pro_plus_v1.4.0.json |
Huawei Mate30 Pro |
TAS-AN00 |
huawei_mate30_pro_5g_v1.4.0.json |
Huawei Mate30 Pro |
TAS-TN00 |
huawei_mate30_pro_5g_v1.4.0.json |
Huawei Mate30 Pro |
LIO-N29 |
huawei_mate30_pro_5g_v1.4.0.json |
Huawei Mate30 Pro |
LIO-L09 |
huawei_mate30_pro_5g_v1.4.0.json |
Huawei Mate30 Pro |
LIO-AL00 |
huawei_mate30_pro_5g_v1.4.0.json |
Huawei Mate30 Pro |
LIO-TL00 |
huawei_mate30_pro_5g_v1.4.0.json |
Huawei Mate30 Pro |
LIO-AL10 |
huawei_mate30_pro_5g_v1.4.0.json |
Huawei Mate30 Pro |
LIO-TL10 |
huawei_mate30_pro_5g_v1.4.0.json |
Huawei Mate30 Pro |
LIO-AN00P |
huawei_mate30_pro_5g_v1.4.0.json |
Huawei Mate30 Pro |
LIO-AN00 |
huawei_mate30_pro_5g_v1.4.0.json |
Huawei Mate40 Pro |
NOH-NX9 |
huawei_mate40_pro_v1.4.0.json |
Huawei Mate40 Pro |
NOH-AN00 |
huawei_mate40_pro_v1.4.0.json |
Huawei Mate40 Pro+ |
NOP-NX9 |
huawei_mate40_pro_plus_v1.4.0.json |
Huawei Mate40 Pro+ |
NOP-AN00 |
huawei_mate40_pro_plus_v1.4.0.json |
Huawei Honor V20 |
PCT-TL10 |
huawei_honor_v20_v1.4.0.json |
Huawei Honor V20 |
PCT-AL10 |
huawei_honor_v20_v1.4.0.json |
Huawei Honor V20 |
PCT-L29 |
huawei_honor_v20_v1.4.0.json |
Honor Magic3 Pro |
ELZ-AN10 |
honor_magic3_pro_v1.4.0.json |
Honor Magic3 Pro+ |
ELZ-AN20 |
honor_magic3_pro_plus_v1.4.0.json |
Honor Magic5 Pro |
PGT-N19 |
honor_magic5_pro_v1.4.0.json |
Apple iPhone X |
iPhone10,3 |
iphone_X_v1.4.0.json |
Apple iPhone X |
iPhone10,6 |
iphone_X_v1.4.0.json |
Apple iPhone XS |
iPhone11,2 |
iphone_XS_v1.4.0.json |
Apple iPhone XS Max |
iPhone11,4 |
iphone_XS_max_v1.4.0.json |
Apple iPhone XS Max |
iPhone11,6 |
iphone_XS_max_v1.4.0.json |
Apple iPhone XR |
iPhone11,8 |
iphone_XR_v1.4.0.json |
Apple iPhone 11 |
iPhone12,1 |
iphone_11_v1.4.0.json |
Apple iPhone 11 Pro |
iPhone12,3 |
iphone_11_pro_v1.4.0.json |
Apple iPhone 11 Pro Max |
iPhone12,5 |
iphone_11_pro_max_v1.4.0.json |
Apple iPhone 12 mini |
iPhone13,1 |
iphone_12_mini_v1.4.0.json |
Apple iPhone 12 |
iPhone13,2 |
iphone_12_v1.4.0.json |
Apple iPhone 12 Pro |
iPhone13,3 |
iphone_12_pro_v1.4.0.json |
Apple iPhone 12 Pro Max |
iPhone13,4 |
iphone_12_pro_max_v1.4.0.json |
Apple iPhone 13 mini |
iPhone14,4 |
iphone_13_mini_v1.4.0.json |
Apple iPhone 13 |
iPhone14,5 |
iphone_13_v1.4.0.json |
Apple iPhone 13 Pro |
iPhone14,2 |
iphone_13_pro_v1.4.0.json |
Apple iPhone 13 Pro Max |
iPhone14,3 |
iphone_13_pro_max_v1.4.0.json |
Apple iPhone 14 |
iPhone14,7 |
iphone_14_v1.4.0.json |
Apple iPhone 14 Plus |
iPhone14,8 |
iphone_14_plus_v1.4.0.json |
Apple iPhone 14 Pro |
iPhone15,2 |
iphone_14_pro_v1.4.0.json |
Apple iPhone 14 Pro Max |
iPhone15,3 |
iphone_14_pro_max_v1.4.0.json |
Apple iPhone 15 |
iPhone15,4 |
iphone_15_v1.4.0.json |
Apple iPhone 15 Plus |
iPhone15,5 |
iphone_15_plus_v1.4.0.json |
Apple iPhone 15 Pro |
iPhone16,1 |
iphone_15_pro_v1.4.0.json |
Apple iPhone 15 Pro Max |
iPhone16,2 |
iphone_15_pro_max_v1.4.0.json |
Apple iPad Pro 11-inch(1st generation) |
iPad8,1 |
ipad_pro_11_gen1_v1.4.0.json |
Apple iPad Pro 11-inch(1st generation) |
iPad8,2 |
ipad_pro_11_gen1_v1.4.0.json |
Apple iPad Pro 11-inch(1st generation) |
iPad8,3 |
ipad_pro_11_gen1_v1.4.0.json |
Apple iPad Pro 11-inch(1st generation) |
iPad8,4 |
ipad_pro_11_gen1_v1.4.0.json |
Apple iPad Pro 11-inch(2nd generation) |
iPad8,9 |
ipad_pro_11_gen2_v1.4.0.json |
Apple iPad Pro 11-inch(2nd generation) |
iPad8,10 |
ipad_pro_11_gen2_v1.4.0.json |
Apple iPad Pro 11-inch(3rd generation) |
iPad13,4 |
ipad_pro_11_gen3_v1.4.0.json |
Apple iPad Pro 11-inch(3rd generation) |
iPad13,5 |
ipad_pro_11_gen3_v1.4.0.json |
Apple iPad Pro 11-inch(3rd generation) |
iPad13,6 |
ipad_pro_11_gen3_v1.4.0.json |
Apple iPad Pro 11-inch(3rd generation) |
iPad13,7 |
ipad_pro_11_gen3_v1.4.0.json |
Apple iPad Pro 11-inch(4th generation) |
iPad14,3 |
ipad_pro_11_gen4_v1.4.0.json |
Apple iPad Pro 11-inch(4th generation) |
iPad14,4 |
ipad_pro_11_gen4_v1.4.0.json |
Apple iPad Pro 12.9-inch(3rd generation) |
iPad8,5 |
ipad_pro_12_9_gen3_v1.4.0.json |
Apple iPad Pro 12.9-inch(3rd generation) |
iPad8,6 |
ipad_pro_12_9_gen3_v1.4.0.json |
Apple iPad Pro 12.9-inch(3rd generation) |
iPad8,7 |
ipad_pro_12_9_gen3_v1.4.0.json |
Apple iPad Pro 12.9-inch(3rd generation) |
iPad8,8 |
ipad_pro_12_9_gen3_v1.4.0.json |
Apple iPad Pro 12.9-inch(4th generation) |
iPad8,11 |
ipad_pro_12_9_gen4_v1.4.0.json |
Apple iPad Pro 12.9-inch(4th generation) |
iPad8,12 |
ipad_pro_12_9_gen4_v1.4.0.json |
Apple iPad Pro 12.9-inch(5th generation) |
iPad13,8 |
ipad_pro_12_9_gen5_v1.4.0.json |
Apple iPad Pro 12.9-inch(5th generation) |
iPad13,9 |
ipad_pro_12_9_gen5_v1.4.0.json |
Apple iPad Pro 12.9-inch(5th generation) |
iPad13,10 |
ipad_pro_12_9_gen5_v1.4.0.json |
Apple iPad Pro 12.9-inch(5th generation) |
iPad13,11 |
ipad_pro_12_9_gen5_v1.4.0.json |
Apple iPad Pro 12.9-inch(6th generation) |
iPad14,5 |
ipad_pro_12_9_gen6_v1.4.0.json |
Apple iPad Pro 12.9-inch(6th generation) |
iPad14,6 |
ipad_pro_12_9_gen6_v1.4.0.json |
6.2. Color/Depth camera IDs and directions that can be started simultaneously
| Device | ColorID | R/F | DepthID | R/F |
|---|---|---|---|---|
Sony Xperia 1 II |
0 |
Rear |
5 |
Rear |
Sony Xperia 1 III |
0 |
Rear |
5 |
Rear |
Sony Xperia 1 IV |
0 |
Rear |
5 |
Rear |
Sony Xperia PRO |
0 |
Rear |
5 |
Rear |
Sony Xperia PRO I |
0 |
Rear |
5 |
Rear |
Samsung Galaxy Note10+ |
0 |
Rear |
4 |
Rear |
Samsung Galaxy S10 5G(Snapdragon) |
0 |
Rear |
4 |
Rear |
Samsung Galaxy S10 5G(Snapdragon) |
0 |
Rear |
5 |
Front |
Samsung Galaxy S10 5G(Snapdragon) |
1 |
Front |
4 |
Rear |
Samsung Galaxy S10 5G(Snapdragon) |
1 |
Front |
5 |
Front |
Samsung Galaxy S10 5G(Snapdragon) |
2 |
Rear |
4 |
Rear |
Samsung Galaxy S10 5G(Snapdragon) |
2 |
Rear |
5 |
Front |
Samsung Galaxy S10 5G(Snapdragon) |
3 |
Front |
4 |
Rear |
Samsung Galaxy S10 5G(Snapdragon) |
3 |
Front |
5 |
Front |
Samsung Galaxy S10 5G(Exynos) |
0 |
Rear |
4 |
Rear |
Samsung Galaxy S10 5G(Exynos) |
1 |
Front |
5 |
Front |
Samsung Galaxy S20 Ultra |
0 |
Rear |
4 |
Rear |
Samsung Galaxy S20+ 4G |
0 |
Rear |
4 |
Rear |
Samsung Galaxy S20+ 5G |
0 |
Rear |
4 |
Rear |
Huawei Honor V20 |
0 |
Rear |
0 |
Rear |
Huawei P30 Pro |
0 |
Rear |
0 |
Rear |
Huawei P40 Pro |
0 |
Rear |
0 |
Rear |
Huawei P40 Pro |
2 |
Rear |
7 |
Rear |
Huawei P40 Pro+ |
0 |
Rear |
0 |
Rear |
Huawei Mate30 Pro |
0 |
Rear |
0 |
Rear |
Huawei Mate30 Pro |
1 |
Front |
1 |
Front |
Huawei Mate30 Pro |
2 |
Rear |
0 |
Rear |
Huawei Mate30 Pro |
2 |
Rear |
7 |
Rear |
Huawei Mate30 Pro |
3 |
Front |
1 |
Front |
Huawei Mate30 Pro |
3 |
Front |
5 |
Front |
Huawei Mate30 Pro |
4 |
Rear |
0 |
Rear |
Huawei Mate40 Pro |
1 |
Front |
1 |
Front |
Huawei Mate40 Pro+ |
0 |
Rear |
0 |
Rear |
Huawei Mate40 Pro+ |
0 |
Rear |
8 |
Rear |
Huawei Mate40 Pro+ |
1 |
Front |
1 |
Front |
Huawei Mate40 Pro+ |
1 |
Front |
5 |
Front |
Huawei Mate40 Pro+ |
2 |
Rear |
0 |
Rear |
Huawei Mate40 Pro+ |
3 |
Front |
1 |
Front |
Huawei Mate40 Pro+ |
4 |
Rear |
0 |
Rear |
Huawei Mate40 Pro+ |
6 |
Rear |
0 |
Rear |
Huawei Mate40 Pro+ |
7 |
Rear |
0 |
Rear |
Honor Magic3 Pro |
0 |
Rear |
3 |
Front |
Honor Magic3 Pro |
1 |
Front |
3 |
Front |
Honor Magic3 Pro+ |
0 |
Rear |
3 |
Front |
Honor Magic3 Pro+ |
1 |
Front |
3 |
Front |
Honor Magic5 Pro |
0 |
Rear |
3 |
Front |
Honor Magic5 Pro |
1 |
Front |
3 |
Front |
iPhone X |
1 |
Front |
1 |
Front |
iPhone XS |
1 |
Front |
1 |
Front |
iPhone XR |
1 |
Front |
1 |
Front |
iPhone 11 |
1 |
Front |
1 |
Front |
iPhone 11 Pro |
1 |
Front |
1 |
Front |
iPhone 11 Pro Max |
1 |
Front |
1 |
Front |
iPhone 12 mini |
1 |
Front |
1 |
Front |
iPhone 12 |
1 |
Front |
1 |
Front |
iPhone 12 Pro |
0 |
Rear |
0 |
Rear |
iPhone 12 Pro |
1 |
Front |
1 |
Front |
iPhone 12 Pro Max |
0 |
Rear |
0 |
Rear |
iPhone 12 Pro Max |
1 |
Front |
1 |
Front |
iPhone 13 mini |
1 |
Front |
1 |
Front |
iPhone 13 |
1 |
Front |
1 |
Front |
iPhone 13 Pro |
0 |
Rear |
0 |
Rear |
iPhone 13 Pro |
1 |
Front |
1 |
Front |
iPhone 13 Pro Max |
0 |
Rear |
0 |
Rear |
iPhone 13 Pro Max |
1 |
Front |
1 |
Front |
iPhone 14 |
1 |
Front |
1 |
Front |
iPhone 14 Plus |
1 |
Front |
1 |
Front |
iPhone 14 Pro |
0 |
Rear |
0 |
Rear |
iPhone 14 Pro |
1 |
Front |
1 |
Front |
iPhone 14 Pro Max |
0 |
Rear |
0 |
Rear |
iPhone 14 Pro Max |
1 |
Front |
1 |
Front |
iPhone 15 |
1 |
Front |
1 |
Front |
iPhone 15 Plus |
1 |
Front |
1 |
Front |
iPhone 15 Pro |
0 |
Rear |
0 |
Rear |
iPhone 15 Pro |
1 |
Front |
1 |
Front |
iPhone 15 Pro Max |
0 |
Rear |
0 |
Rear |
iPhone 15 Pro Max |
1 |
Front |
1 |
Front |
Apple iPad Pro 11-inch(1st generation) |
1 |
Front |
1 |
Front |
Apple iPad Pro 11-inch(2nd generation) |
0 |
Rear |
0 |
Rear |
Apple iPad Pro 11-inch(2nd generation) |
1 |
Front |
1 |
Front |
Apple iPad Pro 11-inch(3rd generation) |
0 |
Rear |
0 |
Rear |
Apple iPad Pro 11-inch(3rd generation) |
1 |
Front |
1 |
Front |
Apple iPad Pro 11-inch(4th generation) |
0 |
Rear |
0 |
Rear |
Apple iPad Pro 11-inch(4th generation) |
1 |
Front |
1 |
Front |
Apple iPad Pro 12.9-inch(3rd generation) |
1 |
Front |
1 |
Front |
Apple iPad Pro 12.9-inch(4th generation) |
0 |
Rear |
0 |
Rear |
Apple iPad Pro 12.9-inch(4th generation) |
1 |
Front |
1 |
Front |
Apple iPad Pro 12.9-inch(5th generation) |
0 |
Rear |
0 |
Rear |
Apple iPad Pro 12.9-inch(5th generation) |
1 |
Front |
1 |
Front |
Apple iPad Pro 12.9-inch(6th generation) |
0 |
Rear |
0 |
Rear |
Apple iPad Pro 12.9-inch(6th generation) |
1 |
Front |
1 |
Front |
6.3. Default Settings for Hand Library and RuntimeMode
| Device | NeuralNetworkLibrary | RuntimeMode | RuntimeModeAfter | Fallback |
|---|---|---|---|---|
Sony Xperia 1 II |
TFLite |
GPU |
GPU |
TFLite |
Sony Xperia 1 III |
TFLite |
GPU |
GPU |
TFLite |
Sony Xperia 1 IV |
TFLite |
GPU |
GPU |
TFLite |
Sony Xperia PRO |
TFLite |
GPU |
GPU |
TFLite |
Sony Xperia PRO I |
TFLite |
GPU |
GPU |
TFLite |
Samsung Galaxy Note10+ |
TFLite |
GPU |
GPU |
TFLite |
Samsung Galaxy S10 5G |
TFLite |
CPU |
CPU |
TFLite |
Samsung Galaxy S20 Ultra |
TFLite |
GPU |
GPU |
TFLite |
Samsung Galaxy S20+ 4G |
TFLite |
GPU |
GPU |
TFLite |
Samsung Galaxy S20+ 5G |
TFLite |
GPU |
GPU |
TFLite |
Huawei Honor V20 |
TFLite |
CPU |
CPU |
TFLite |
Huawei P30 Pro |
TFLite |
CPU |
CPU |
TFLite |
Huawei P40 Pro |
TFLite |
CPU |
CPU |
TFLite |
Huawei P40 Pro+ |
TFLite |
CPU |
CPU |
TFLite |
Huawei Mate30 Pro |
TFLite |
CPU |
CPU |
TFLite |
Huawei Mate40 Pro |
TFLite |
CPU |
CPU |
TFLite |
Huawei Mate40 Pro+ |
TFLite |
CPU |
CPU |
TFLite |
Honor Magic3 Pro |
TFLite |
GPU |
GPU |
TFLite |
Honor Magic3 Pro+ |
TFLite |
GPU |
GPU |
TFLite |
Honor Magic5 Pro |
TFLite |
GPU |
GPU |
TFLite |
Apple iPhone X |
TFLite |
GPU |
GPU |
TFLite |
Apple iPhone XS |
TFLite |
GPU |
GPU |
TFLite |
Apple iPhone XS Max |
TFLite |
GPU |
GPU |
TFLite |
Apple iPhone XR |
TFLite |
GPU |
GPU |
TFLite |
Apple iPhone 11 |
TFLite |
GPU |
GPU |
TFLite |
Apple iPhone 11 Pro |
TFLite |
GPU |
GPU |
TFLite |
Apple iPhone 11 Pro Max |
TFLite |
GPU |
GPU |
TFLite |
Apple iPhone 12 mini |
TFLite |
GPU |
GPU |
TFLite |
Apple iPhone 12 |
TFLite |
GPU |
GPU |
TFLite |
Apple iPhone 12 Pro |
TFLite |
GPU |
GPU |
TFLite |
Apple iPhone 12 Pro Max |
TFLite |
GPU |
GPU |
TFLite |
Apple iPhone 13 mini |
TFLite |
GPU |
GPU |
TFLite |
Apple iPhone 13 |
TFLite |
GPU |
GPU |
TFLite |
Apple iPhone 13 Pro |
TFLite |
GPU |
GPU |
TFLite |
Apple iPhone 13 Pro Max |
TFLite |
GPU |
GPU |
TFLite |
Apple iPhone 14 |
TFLite |
GPU |
GPU |
TFLite |
Apple iPhone 14 Plus |
TFLite |
GPU |
GPU |
TFLite |
Apple iPhone 14 Pro |
TFLite |
GPU |
GPU |
TFLite |
Apple iPhone 14 Pro Max |
TFLite |
GPU |
GPU |
TFLite |
Apple iPhone 15 |
TFLite |
GPU |
GPU |
TFLite |
Apple iPhone 15 Plus |
TFLite |
GPU |
GPU |
TFLite |
Apple iPhone 15 Pro |
TFLite |
GPU |
GPU |
TFLite |
Apple iPhone 15 Pro Max |
TFLite |
GPU |
GPU |
TFLite |
Apple iPad Pro 11-inch(1st generation) |
TFLite |
GPU |
GPU |
TFLite |
Apple iPad Pro 11-inch(2nd generation) |
TFLite |
GPU |
GPU |
TFLite |
Apple iPad Pro 11-inch(3rd generation) |
TFLite |
GPU |
GPU |
TFLite |
Apple iPad Pro 11-inch(4th generation) |
TFLite |
GPU |
GPU |
TFLite |
Apple iPad Pro 12.9-inch(3rd generation) |
TFLite |
GPU |
GPU |
TFLite |
Apple iPad Pro 12.9-inch(4th generation) |
TFLite |
GPU |
GPU |
TFLite |
Apple iPad Pro 12.9-inch(5th generation) |
TFLite |
GPU |
GPU |
TFLite |
Apple iPad Pro 12.9-inch(6th generation) |
TFLite |
GPU |
GPU |
TFLite |
7. Restrictions and limitations
7.1. ToF AR v1.4.0
-
When you set RecogMode→OneHandHldSmapho, ProcessLevel→HandCenterOnly in the Hand recognition function, the recognition result will always be recognized as right hand.
7.1.1. iOS
-
In AR Foundation Application, SceneMesh functions are not supported.
-
Modeling components are not supported.
-
TofARServer doesn’t support USB connection with iOS devices.
-
Only Face2Face is valid as a recognition mode (RecogMode) for the Hand component. Use of an invalid recognition mode will result in an exception.
7.1.2. Android
-
When the FPS or Exposure is changed from the default values in the ToF and Color components, the Camera2 API may stop and video may not be updated, depending on the device model.
-
HandLibrary performance slows down if you set the Runtime Mode to CPU with Huawei P30 Pro.
-
Depending on the device, misalignment of the ToF and Color images when using the Coordinate component etc. may occur when superimposing.
Appendix A: Glossary
- AR
-
An abbreviation for Augmented Reality. This is the technology that superimposes digital information such as CG on real images.
- ToF
-
An abbreviation for Time of Flight. This is the method of measuring the distance from a camera to an object based on the reflection time of infrared light.
- ToF AR
-
The product name of this software. This name comes from the feature that generates recognition data for AR using ToF camera information. The product name is ToF AR, but TofAR or TofAr are used for folder names and package names.
- Confidence
-
Confidence means the intensity of the infrared reflected light received by the ToF camera. Normally, the higher the value of Confidence, the higher the reliability of the distance measurement. Regarding the information of this value, the information displayed as an image is expressed as Confidence image, and the information to be processed is expressed as Confidence data.
- Depth image and Depth data
-
Regarding the 3D information from ToF camera, the displayed information is expressed as Depth image, and the processed information is expressed as Depth data.
- Color image and Color data
-
Regarding the RGB information from RGB camera, the displayed information is expressed as Depth image, and the processed information is expressed as Depth data.
- Stream and Stream data
-
Regarding the data handled by ToF AR including Depth data, the I/F (interface) of this data is expressed as Stream, and the data retrieved from the I/F is expressed as Stream data.
Appendix B: PointCloud2ParticleSystem.cs
using System.Collections;
using System.Collections.Generic;
using TofAr.V0.Tof;
using UnityEngine;
public class PointCloud2ParticleSystem : MonoBehaviour
{
private ParticleSystem particleSystem;
private ParticleSystem.Particle[] particles;
private object sync = new object();
private bool updated = false;
private Vector3[] vs;
// Start is called before the first frame update
void Start()
{
particleSystem = GetComponent<ParticleSystem>();
}
void OnEnable()
{
    TofArTofManager.OnFrameArrived += OnTofFrameArrived;
}
private void OnDisable()
{
    TofArTofManager.OnFrameArrived -= OnTofFrameArrived;
}
// Update is called once per frame
void Update()
{
if (updated)
{
updated = false;
lock (sync)
{
particles = new ParticleSystem.Particle[vs.Length];
particleSystem.GetParticles(particles);
for (int i = 0; i < vs.Length; i++)
{
particles[i].position = vs[i];
float r = Mathf.Min(1, Mathf.Max(0, (vs[i].z) / 2));
float g = Mathf.Min(1, Mathf.Max(0, (vs[i].y + 1f) / 2));
float b = Mathf.Min(1, Mathf.Max(0, (vs[i].x + 1f) / 2));
particles[i].startColor = new Color(r, g, b);
particles[i].startSize = 0.02f;
}
particleSystem.SetParticles(particles);
}
}
}
private void OnTofFrameArrived(object stream)
{
    if (!TofArTofManager.Instantiated)
    {
        return;
    }

    var pointCloudData = TofArTofManager.Instance.PointCloudData;
    if (pointCloudData == null || pointCloudData.Points == null)
    {
        return;
    }

    lock (sync)
    {
        vs = pointCloudData.Points;
    }
    updated = true;
}
}Appendix C: Changelog
| Version | Changes |
|---|---|
v1.4.0 |
|
v1.3.0 |
|
v1.2.0 |
|
v1.1.0 |
|
v1.0.0 |
Initial ToF AR release. |